Showing posts with label summer. Show all posts
Showing posts with label summer. Show all posts
Friday, June 19, 2015
Spicy Thai Peanut Noodle Salad A Perfect Summer Potluck Dish
Hard to believe, but it’s just under a week until July 4th! Between now and then, I’ll be sharing recipes that are perfect for celebrating with family and friends! I’ve got a fun twist on potato salad to share for this week’s #SundaySupper...as well as a firecracker of a burger recipe and a fun vanilla treat...coming up in the next few days. Today, I’m kicking things off with a flavorful Spicy Thai Peanut Noodle Salad. It’s perfect for taking to summer potlucks, because it’s delicious both cold and at room temperature...and it contains no dairy products.
As soon as I saw this recipe on the Cooks Country website last week, I immediately added it to this weeks menu! Cook’s Country is part of the America’s Test Kitchen family, and their recipes never disappoint! What’s not to like? They do all the trial-and-error work for you. All you have to do is make the final kitchen-tested, no-fail recipe and enjoy the compliments! I used their peanut-based dressing recipe and prep technique, but I did make a few small tweaks. I added sriracha to the dressing instead of the suggested Tabasco, and I changed the veggies up just a bit. I used crunchy cucumber and carrot, as well as a double shot of onions This salad is knock-your-socks-off good!
Spicy Thai Peanut Noodle Salad
adapted from Cooks Country

Step 1: Cook 1 lb. of spaghetti in a pot of well-salted water. While the pasta cooks, make the dressing. Add the following ingredients to a large bowl: 3/4 cup chunky peanut butter, 1/3 cup soy sauce, 3 tbs. vinegar, 1 tbs. grated fresh ginger, 1 tbs. sriracha (or Tabasco), 1 tsp. honey, 1/3 cup of the starchy pasta cooking water, and 1 tsp. dried cilantro. Whisk well to combine and set aside.

Step 2: When the pasta is cooked, drain well in a colander under cold water. Keep rinsing until the pasta has cooled to room temperature. Place the cooled spaghetti in a large bowl and add 2 tbs. sesame oil...toss to evenly coat. Add the following veggies: 1/2 a cucumber seeded and cut into a small dice, 1/2 cup carrot cut into bite-sized pieces, 4 sliced green onions, and 1/2 cup sweet yellow onion cut into thin matchstick slivers.

Step 3: Add the reserved dressing and 2 tbs. chopped flat-leaf parsley. Toss everything together with tongs. Make sure that the dressing evenly coats all the noodles and the veggies. Serve immediately at room temperate or chill. The original recipe notes that you should remove chilled pasta from the fridge about 20 minutes before serving for the proper consistency.


Tuesday, February 10, 2015
The Perfect Summer Side Dish Corn Maque Choux Featuring Red Gold Petite Diced Tomatoes

Today is the first in an ongoing series of posts featuring Red Gold tomato products. As many of you know, I visited Red Gold’s corporate headquarters in Indiana this past February as one of the winners in their Taste of the NFL food blogger contest. I was already a fan of their products before that trip, but I left Indiana with a deep appreciation of their commitment to their products. On top of that, the Reichart family and their employees are basically the nicest people you’d ever want to meet. That’s why I was so thrilled when they asked me to continue partnering with them to feature some of their tomato products and recipes for you!
I would never steer my readers wrong, so you can believe me when I say that Red Gold is the only brand of canned tomatoes that I use in my kitchen. I witnessed first-hand the enthusiasm that they have for their products...and the passion that they have to create high-quality products. They recently sent me two cans of their petite diced tomatoes to cook with and share the results with you. I visited their website to check out their recipes...and one side dish immediately jumped out at me: Corn Maque Choux (pronounced mock shoo). It’s a Cajun dish that features fresh-from the-cob sweet corn and Red Gold petite diced tomatoes. Oh, did I mention that it has bacon too?!?!?
I made a few tweaks to Red Gold’s recipe since we like our food on the spicy side. I subbed half of a poblano pepper in place of bell pepper, and I added some of my favorite Cajun spice blend to up the spice factor even more. To save a bit of time in the kitchen, you can use frozen corn kernels in this dish. That said, fresh sweet corn is at its peak right about now, and it only takes a few minutes to cut the kernels fresh from the cob. Its worth it to enjoy fresh-from-the-cob summer corn while its at its peak!!
Corn Maque Choux
adapted from Red Gold

Step 1: Cut two slices of bacon into pieces; add to a large non-stick skillet and cook over medium heat until golden. Drain on paper towels and set aside; remove all except 1-2 tbs. of the bacon grease from the pan. Add 1 cup diced yellow onion and half of a diced, seeded poblano pepper. Saute until the onions start to turn golden...about 5 minutes. Add 2 tsp. of your favorite Cajun spice blend. While the veggies cook, cut the kernels off four ears of corn...making sure to go back and scrape the sweet milk and pulp from the cobs after you remove the kernels. You should have about 4 cups of corn. Add the corn to the skillet and stir to combine.

Step 2: Cook for about 10 minutes, stirring occasionally. Then add 1 well-drained can of Red Gold petite diced tomatoes. Stir to combine and continue cooking for another 15 minutes, until the corn is tender.

Step 3: Turn off the heat and add 1/2 cup half and half, 2 sliced green onions, and the reserved bacon pieces. Stir to combine, transfer to a serving bowl or platter, and serve.


Wow...this dish pops with all sorts of vibrant colors and flavors! The juicy tomatoes, sweet fresh corn, and smoky bacon combine perfectly. Plus, the half and half gives the dish a subtle richness in the background. If you like your food less-spicy than we do, simply use bell pepper instead of the poblano...and reduce or leave out the Cajun seasoning. This is a fantastic Summer side dish...I served it with Cajun turkey mini meatloaves and mashed potatoes, but it would pair nicely with any grilled meat.
Guest Post Food and Grilling Ideas for Summer Featuring Herb Butter Grilled Corn
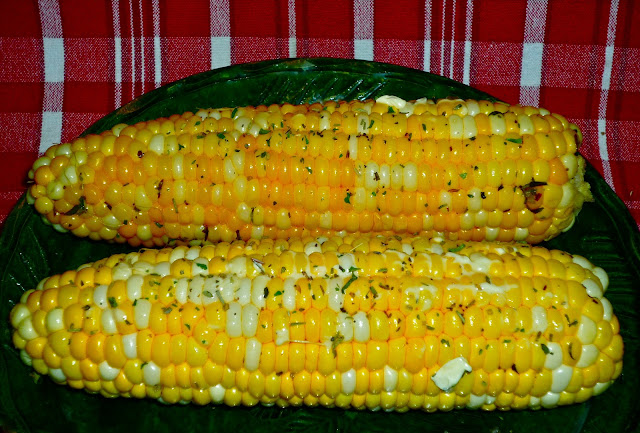
Good morning, friends! Today Im sharing a delectable guest post with you. Jenny is here to share a delicious and fun Summertime side dish featuring sweet in-season corn-on-the-cob. The herb butter and smoked salt give it a wonderful aroma as it cooks, and it tastes great!
---------------------------------------------
Corn is a popular staple that is at its peak during the Summer months. Sweet and crunchy, it’s a common accompaniment to grilled meats, or as an ingredient in salads and salsas. Corn is also high in Vitamin A, with 355 IU per one-cup serving, and high in dietary fiber. You can cook corn in a variety of ways, but dry heat like roasting or grilling brings out corn’s natural sweetness. A pinch of Herbs du Province adds an earthy element and enhances the flavor of the corn.
(1) Preheat the oven to 350 degrees Fahrenheit. If you are using a grill without a thermostat, use a thermometer to determine when the grill is between 300 and 400 degrees.
Read more »
---------------------------------------------
Corn is a popular staple that is at its peak during the Summer months. Sweet and crunchy, it’s a common accompaniment to grilled meats, or as an ingredient in salads and salsas. Corn is also high in Vitamin A, with 355 IU per one-cup serving, and high in dietary fiber. You can cook corn in a variety of ways, but dry heat like roasting or grilling brings out corn’s natural sweetness. A pinch of Herbs du Province adds an earthy element and enhances the flavor of the corn.
Herb-Butter Grilled Corn
What you Need:
- 1 Large sheet of aluminum foil
- 4 pats of butter, softened
- 1 Tbsp Herbs du Province
- 1 Tsp smoked sea salt
- 4 large ears of corn, shucked with silk removed
(1) Preheat the oven to 350 degrees Fahrenheit. If you are using a grill without a thermostat, use a thermometer to determine when the grill is between 300 and 400 degrees.
(2) Spread out enough foil to wrap all four ears of corn in one packet. Spread the softened butter on the foil. Leave about one inch of clean foil around all the edges. Sprinkle the herbs du Province and smoked sea salt onto the butter. Try to get the coverage as even as possible.
(3) Lay the corn out on the foil. Leave about ½ inch of space between each ear. Leaving space keeps the ears from sticking together and ensures even cooking. Sprinkle cold water on the corn. The water will provide a little steam to prevent the corn from drying out in the grill or oven.
(4) Wrap the foil around the corn and seal the edges. Making a good seal ensures the steam will stay in, it will also prevent the butter from escaping. Put the corn in the oven, or grill, and let it cook for 15 to 20 minutes.
(5) Remove the corn and let it cool inside the foil wrapper. Open the pouch carefully and transfer the corn to a serving dish with raised sides. The raised sides will trap any herbed butter that did not absorb into the corn. Serve the corn on its own, or with your favorite summer cookout classics.

If you don’t have Herbs de Province, you can also make a blend of dried rosemary and thyme. If you can’t find smoked sea salt, you can use regular sea salt instead. Of course, you can also use other herbs and spices like dried garlic or Old Bay seasoning instead of the Herbs du Province. You can find different herb mixes at your local grocery store, as well as through some specialty retailers.
Cooks Note: If you need to make more than four ears of corn, remember that it’s one pat of butter per ear; one tablespoon of seasoning and one teaspoon of smoked sea salt for every four ears.
Disclosure: Consideration was received by The Weekend Gourmet for the editing and publishing of this feature article. However, I did test the recipe in my kitchen so I could taste test it and photograph it for the article.
Disclosure: Consideration was received by The Weekend Gourmet for the editing and publishing of this feature article. However, I did test the recipe in my kitchen so I could taste test it and photograph it for the article.
Monday, February 9, 2015
Kicking Off Summer with a Summer Kiss Cocktail and a Pina Colada Fizz Mocktail!

 Just in time for the three-day Memorial Day weekend, I’m sharing a couple of fun and refreshing Summer-inspired beverages with you today. One is an adult’s only fruit-infused cocktail, and the other is a fizzy family-friendly mocktail. Both beverages are flavored with fresh Summer fruit, and theyre perfect for any BBQs or other outdoor parties you have planned this long holiday weekend...or all Summer long! First up is an original creation, my Summer Kiss Cocktail, which is flavored with juicy fresh raspberries. I absolutely love the vibrant pink color they brought to my finished drink! The Summer Kiss Cocktail features two of my favorite cocktail ingredients: Skimpy Mixers and Pinnacle Tropical Punch flavored vodka.
Skimpy Mixers are made in Dallas, and they really help keep the calories down in your favorite cocktails while delivering a bright punch of flavor. For this Summery cocktail, I wanted a tart citrus backnote…so I used Skimpy Margarita mixer. It has just 20 calories per serving, and it contains real fruit juice. If you haven’t tried Pinnacle flavored vodkas, they have a great line of infused vodkas in lots of fun flavors. The Tropical Punch flavor provides just the fruit punch flavor that my cocktail needed. For fizz, I added sugar-free citrus soda, along with some cream of coconut for a tropical nod. Add some ice and blend the ingredients up, and you’ve got a fantastic cocktail to kick off Summer!
Summer Kiss Cocktail
a Weekend Gourmet Original

Ingredients (makes two cocktails):
- 2 ounces Pinnacle Fruit Punch Vodka
- 4 ounces Skimpy Mixers Margarita
- 4 ounces sugar-free citrus soda [NOTE: I used Fresca]
- ½ cup fresh raspberries (approx. 8-10 raspberries)
- 1 ounce cream of coconut
- 1 cup crushed ice
Directions: Add the crushed ice to the bottom of a blender container. Add the vodka, Skimpy Mixer, sugar-free citrus soda, raspberries, and cream of coconut. Cover and blend until the ice is completed incorporated, then pour into two cocktail glasses. Garnish with maraschino cherries if you like. NOTE: For an even icier cocktail, freeze the raspberries.
This cocktail is so delicious! I loved the tart background flavor from the citrus soda and Skimpy Margarita mixer. The tart, juicy raspberries provided a gorgeous color...and their flavor paired really well with the Tropical Punch Pinnacle Vodka. The little bit of cream of coconut provided the perfect coconut flavor and aroma that says Summer is here! Using sugar-free mixers helped keep the overall calorie count of this cocktail down too. This one’s a keeper, folks. Speaking of keeper…wait until you see the fun mocktail I’m sharing today!

 As a hostess, I am understand that not everyone wants to partake in an alcoholic beverage...and the little ones like to enjoy a fun tropical drink too! My Pina Colada Fizz Mocktail is my idea of a perfect alcohol-free warm-weather beverage to enjoy poolside. It features all the flavors of a tropical pina colada, with the addition of a refreshing fizz. The fizz in this mocktail comes from adding sugar-free Coconut Cascade Ice before blending. Cascade Ice Sparkling Water has zero calories, and it comes in a ton of yummy fruit flavors. I buy this product nearly every week, so I was really excited to create a special beverage featuring their product! This mocktail is a breeze to make, and it tastes SO good. The smell of the coconut will immediately remind you of being at the beach...even if you live miles inland! Trust me...this one’s going to be in regular rotation at my house all Summer long.
Pina Colada Fizz Mocktail
a Weekend Gourmet Original

Ingredients (makes one mocktail):
- 1 cup frozen organic pineapple chunks
- 8 ounces Cascade Ice Coconut sparkling water
- 2 ounces cream of coconut
Directions: Add the frozen pineapple chunks to the bottom of a blender container. Add the Cascade Ice Coconut and cream of coconut. Blend until the ingredients are completely blended and smooth. Pour into a tall glass and serve with a straw – paper umbrella is optional!
This mocktail is a taste of the tropics! The addition of fresh pineapple provides a fruity punch of flavor, and the cream of coconut amps up the coconut flavor from the Cascade Ice. I loved the fizz that the sparkling water provided...it makes the pina colada light and refreshing. This is a beverage that can be enjoyed by adults and kids alike...and it’s perfect for sipping by the pool or around the grill!
This mocktail is a taste of the tropics! The addition of fresh pineapple provides a fruity punch of flavor, and the cream of coconut amps up the coconut flavor from the Cascade Ice. I loved the fizz that the sparkling water provided...it makes the pina colada light and refreshing. This is a beverage that can be enjoyed by adults and kids alike...and it’s perfect for sipping by the pool or around the grill!
Disclosure: Skimpy Mixers, Pinnacle Vodka, and Cascade Ice provided me with samples of their products to facilitate my recipe development for this article. All opinions expressed are solely my own.
Saturday, February 7, 2015
Introducing TheSaladBar Monthly Group Strawberry Mango Chicken Salad with Summer Berries
 In case you havent noticed by all the salad recipes I share in here, we eat a lot of salads here at Casa Garcia. Especially during the hot Texas Summer that seems to go on...and on...forever. Face it, salads have a lot going for them: theyre light and refreshing, theyre very healthy, and theyre extremely versatile. Since Im always looking for new salads to add to my dinner rotation, I decided to start a new monthly recipe sharing group called The Salad Bar. Each month, I will select a theme...and members of the group will share a salad recipe that fits the theme. It can be a side salad or a main dish salad. As long as it fits the theme, I really want participants to have fun and let their creativity shine! For the inaugural event, I went with one of my favorite go-to Summertime ingredients: berries. Blueberries, strawberries, blackberries or raspberries...and beyond! I love to add strawberries to our salads, so I picked up some gorgeous local strawberries this week and created a quick and easy main dish salad to share today.
My Strawberry-Mango Chicken Salad combines diced strawberry and mango over a base of field greens, for a slightly tropical feel. I had some chipotle marinated chicken chunks in the freezer, so I grilled them up. Add in some candied nuts, creamy feta and crunchy wonton strips...and it was a salad so heart that it satisfied Michaels manly appetite.

I whipped up a simple and flavorful strawberry-infused vinaigrette while the chicken seared. All together, it took me about 30 minutes to make two main dish salads. I added some frozen garlic breadsticks on the side, but you can certainly serve this filling salad "as is" for a healthy and hearty warm-weather dinner.
Strawberry-Mango Chicken Salad with Strawberry Vinaigrette
a Weekend Gourmet original


Step 2: Pan sear 3/4 lb. of chicken breast that is seasoned to your liking. We like spicy, so I used some chipotle-marinated breast. Once the chicken is seared and cooked through, let it rest for about 5 minutes so the juices go back into the meat. Cut into bite-sized pieces.
Step 3: To assemble the salads, add a package of field greens to a large bowl. Toss with about 1/2 cup of the vinaigrette, then arrange half of the greens onto two plates. Top with: quartered strawberries, diced mango (about half a small mango per salad), crumbled feta or blue cheese, candied pecans, and wonton crisps. I buy the strips in the Produce section of my local grocery store. If you cant locate them, crushed tortilla chips would work too. Just before serving, drizzle a bit more of the reserved vinaigrette on top of each salad.
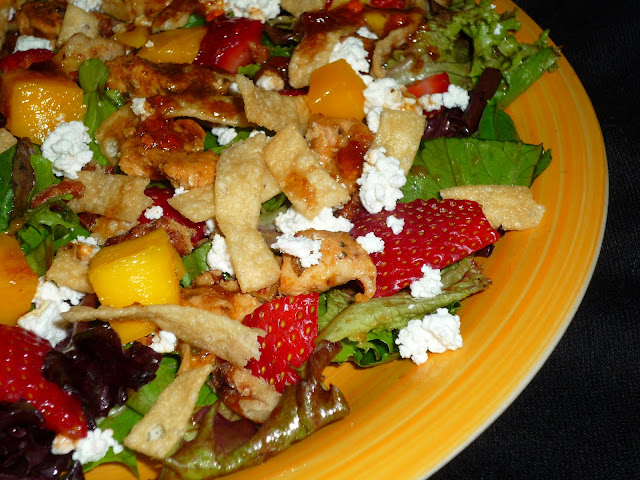
This salad is hearty, but light. The strawberries and mango work really nicely together, and both can stand up to the spices on the chicken. Add in some salty, creamy feta and texture from the nuts and wonton strips...and youve got a lot of fantastic flavors and textures going on! The dressing is really nice, providing a nice balance of sweet and tart. Homemade dressing takes a few minutes to make, but it tastes better than most bottled dressings.
I hope youll give my salad a try on the next warm Summer evening. I also hope youll check out all the great berrylicious salads that the other members of The Salad Bar are sharing today. To visit them, simply click on the picture in the links below. I know I cant wait to try them in my kitchen during the long, hot Texas Summer thats just getting started! If youre a salad lover, wed love to have you join us at The Salad Bar. To join, simply visit our Facebook page to sign up.
);
Friday, February 6, 2015
Summer Breeze Corn Salad and a Green Giant BlogSpark Prize Pack Giveaway

For many people, the upcoming Memorial Day weekend is the unofficial kickoff to summer! Here in Texas, we start warming up in April…so we’re already wearing our capris and getting pedis so we can wear sandals. And? We’re also eating lighter food. Being a food blogger has had one unintended side effect: a "few" extra unwanted pounds! As a result, I’m making an effort to cook and share more light options with yall. To help make eating healthier easier, the folks at MyBlogSpark teamed up with Green Giant and Weight Watchers to send me a prize pack that helps make eating light on-the-go much easier.

Veggies are an important part of a healthy lifestyle, so I make an effort to eat my recommended five servings of fruits and veggies each day. It’s not always easy, but Green Giant Steamers are really convenient for me. I just pop ‘em in the microwave, and they’re ready to eat in a matter of minutes. FYI...Green Giant is the only frozen vegetable brand to be endorsed by Weight Watchers, and most of their 30 varieties are only 1 or 2 PointsPlus per serving. You can even visit http://bit.ly/greengiantcoupon to download a printable coupon for $.60 off the purchase price of two boxes of Weight Watchers endorsed Green Giant Boxed Vegetables.
I decided that I wanted to create a healthy and refreshing salad using the white shoepeg corn that I purchased with my coupon. This is my riff on one of my favorite summer salads that my mother-in-law serves with grilled steak. Her salad combines tomato, cucumber, avocado, and purple onion tossed with store-bought Italian dressing. I made two tweaks to her recipe: I added sweet shoepeg corn to the veggies, and I made a homemade vinaigrette featuring lime juice, heart-healthy olive oil, and a bit of cilantro.
Summer Breeze Corn Salad
adapted from my mother-in-law

Step 1: Add the following ingredients to a large mixing bowl: 1 thawed package Green Giant Steamers White Shoepeg Corn, two small chopped tomatoes (seeded), 1/4 cup finely diced purple onion, 1 small seeded chopped cucumber, and 1 diced avocado.


Step 3: Pour the dressing over the veggies in the bowl and stir well to combine. Be gentle so you dont break up the avocado too much, especially if its very ripe! Refrigerate for at least 30 minutes to let the flavors combine before serving.


This refreshing salad takes 15 minutes max to toss together, but it’s the perfect for summer: light and bursting with flavor! The creamy avocado and crunchy cucumber plays really nicely against the sweet corn...and the cilantro and lime in the dressing give it a bit of zest! This salad is best served the same day in order for the avocado to look its best, but I like to make it 1-2 hours before serving to let the flavors combine just a bit. I served this with simple marinated grilled chicken breast and rice pilaf for a fantastic simple supper.
So...who wants to win one of these fun prize packs from MyBlogSpark? Simply comment below telling me which vegetable you would choose with your free coupon...and how you would use it in a healthy summer dish. Ill accept entries until 1159 PM this Friday...and Ill announce the winner this weekend.
Wednesday, February 4, 2015
Summer Berries SundaySupper Featuring Strawberry Chocolate Frozen Yogurt Parfaits
This week’s #SundaySupper theme is near and dear to my heart: berries! I adore berries…any and all…in both sweet and savory dishes. Nicole from Daily Dish Recipes challenged us to come up with fun Summer recipes featuring berries. Strawberries are my favorite berry…and I found some gorgeous organic strawberries at Trader Joe’s this week. After featuring a strawberry salad for a previous #SundaySupper theme, I decided to go with something sweet and healthy this time. To me, there’s no better Summertime dessert than ice cream…add in some strawberries, and all you need is a spoon to get the party started!
I made these fruity Strawberry-Chocolate Frozen Yogurt Parfaits for our dessert one evening this week. The sauce can be made a day ahead, then stored in an airtight container in the fridge until you’re ready to assemble your parfaits. This amazing sauce contains a combination of cooked and fresh chopped berries and is flavored with vanilla, Meyer lemon juice, and a bit of port. The alcohol in the port cooks off as the sauce simmers, but feel free to sub orange juice for the port if you want to make it totally kid-friendly.

This luscious strawberry sauce took about 15 minutes to whip up after work one night, then I poured it into a plastic container and refrigerated overnight. When we were ready for our dessert the next night, all I had to do was soften the frozen yogurt and layer it with the strawberry sauce and shaved chocolate. Easy peasy, healthy and delish you say? No problem...I’ve got you covered, friends!
Strawberry-Chocolate Frozen Yogurt Parfaits
adapted from Cooking Light

Step 1: Make the strawberry sauce by adding the following ingredients to a small saucepan over med-high heat: 8 ounces diced strawberries (bite size), ¼ cup Meyer lemon juice, ¼ cup port, 1/3 cup sugar, and 1 tbs. vanilla bean paste (or vanilla extract). Stir the ingredients to combine and heat until boiling.

Step 2: Lower heat to medium and boil the strawberry mixture for 8 minutes, stirring every few minutes. Use a spoon to break up the strawberries a bit and release their juices. Remove from heat and add 8 ounces chopped fresh strawberries. Stir to combine and pour into a plastic container. Refrigerate at least an hour before assembling the parfaits. [NOTE: The sauce will last 2-3 days in the fridge.]

Step 3: Assemble the parfaits. In four wine goblets or clear glasses, add ½ cup fat-free vanilla Greek frozen yogurt. Top each parfait with 2 tbs. of the strawberry sauce and 1 tbs. shaved semisweet chocolate. [NOTE: I used a vegetable peeler and shaved a Hershey Special Dark bar.] Top each parfait glass with an additional ½ cup of yogurt, another 2 tbs. of the strawberry sauce, and more shaved chocolate.

If you love chocolate-covered strawberries and ice cream, this is the dessert for you! The creamy frozen yogurt, lemon-port-spiked strawberries, and earthy dark chocolate are a match made in heaven. The fact that this is so low in fat is an added bonus. It feels totally decadent, but it’s only a small splurge. Michael commented that this would be even better using strawberry ice cream, and I have to agree that it would be a pretty perfect pairing. Maybe next time, that’s what I’ll do! This berry sauce can also be made with raspberries or blueberries if you prefer…blueberries would pair really nicely with Meyer lemon juice!
Make sure to join us later today for our weekly #SundaySupper chat at 600 CST. Before that, I hope you’ll take a few minutes to check out all the fun berrylicious recipes my fellow #SundaySupper participants are sharing:
Breakfast & Brunch
- Angel Food French Toast with Blueberry Lemon Sauce by Neighborfood
- Blueberry Lemon Baked Doughnuts by Small Wallet, Big Appetite
- Blueberry Rhubarb Baked Oatmeal by Pies and Plots
- Overnight Strawberry Stuffed French Toast by In The Kitchen With KP
- The Best Blueberry Muffin by Supper For a Steal
Sweet & Savory Berry Recipes
- Herbed Pork Tenderloin with Wild Blueberry Sauce by Noshing With The Nolands
- Red, White, and Blue Chicken Salad by MarocMama
- BBQ Strawberry Pizza by Jane’s Adventures in Dinner
Jams, Jelly, Sauces & More
- Blackberry Ketchup by Healthy. Delicious.
- Four-Berry Jelly by Blueberries and Blessings
- Mixberry Jam with Merlot by The Urban Mrs
- Roasted Strawberry Tarragon Butter by Gourmet Drizzles
- Strawberry Freezer Jam by Growing Up Gabel
Desserts
- Strawberry Crumb Bars by The Girl in the Little Red Kitchen
- No-Bake Frozen Berrylicious Cracker Cake by Shockingly Delicious
- Strawberry Cream Cheese Dessert by That Skinny Chick Can Bake
- Fruit Salsa with Cinnamon Sugar Chips by Hezzi-D’s Books and Cooks
- Lattice-Top Blueberry Pie by Hip Foodie Mom
- Caramelized White Chocolate Raspberry Cheesecake by Vintage Kitchen
- Strawberry Shortcakes by Juanita’s Cocina
- Berrylicious Ice Cream by NinjaBaking.com
- Stove Top Berry Crumble by Peanut Butter and Peppers
- Strawberry Yogurt Popsicle by Mama’s Blissful Bites
- Peggy’s Cove Blueberry Grunt by Kudos Kitchen By Renee
- Chocolate-Raspberry Yoghurt Cookies by What Smells So Good?
- Strawberry Ice Cream by Basic N Delicious
- Financiers with a Summer Berry Salad by The Lovely Pantry
- Strawberry Pretzel Salad by Curious Cuisiniere
- Strawberry-Chocolate Frozen Yogurt Parfaits by The Weekend Gourmet
- Summer Berry Salad with a Honey Citrus Dressing by Runner’s Tales
- Strawberry Pop-Tart Ice Cream by Foxes Love Lemons
- Strawberries with Cannoli Cream by Comfy Cuisine
- Strawberry Quesadillas by La Cocina de Leslie
- Almond Cake with Blackberry Mascarpone Filling by Ruffles & Truffles
- Oregon Strawberry Sundae {Dairyfree} by The Not So Cheesy Kitchen
- Blackberry Pie w/Brandied Whipped Cream by Webicurean
- Vo-Vo’s Famous Strawberry Cheesecake by Family Foodie
- Raspberry Mousse by Cindy’s Recipes and Writings
- Mini Strawberry Cheesecake with Walnut Crust by Soni’s Food
- Salted Caramel Strawberries With a Crunchy Nut Coating by Sue”s Nutrition Buzz
- Strawberry Blueberry Stuffed Monkey Bread by Daily Dish Recipes
Cocktails, Drinks & Smoothies
- Berry Berry Smoothie by Momma’s Meals
- Blueberry Infused Vodka by Big Bear’s Wife
- Blueberry Moscow Mule with Homemade Ginger Beer by I Run For Wine
- Goji Berry Martini by Magnolia Days
- Irish Cobbler by girlichef
Party Planning
- Recipes + Tips to Create A Summer Berry Cocktail Bar by An Appealing Plan
Saturday, January 31, 2015
Putting the Sizzle in Summer Zesty Margarita Chicken Tacos with Creamy Chipotle Lime Drizzle
I dont know about you, but pretty much the last thing that I want to do when it’s so hot outside is fire up my oven to cook dinner. For me, that means lots of grilling on the stove using my beloved Le Creuset cast-iron grill pan. I was in the mood for tacos this week, so I pulled out one of my favorite cookbook discoveries of last year: 300 Best Taco Recipes. I had flagged a recipe for margarita-flavored chicken soft tacos to try, so that was my springboard for today’s recipe: Zesty Margarita Chicken Tacos with Creamy Chipotle-Lime Drizzle.
I tweaked the recipe, adding a few extra goodies to the flavorful marinade. I also included a spicy-tangy cream drizzle, caramelized Maui onions, crumbled queso fresca, and tangy tomato. These tacos are flavored with non-alcoholic margarita mix in the marinade, which you can find in the mixer aisle of most grocery stores. Make sure to allow at least two hours for the chicken to marinate in the fridge. It can marinate up to overnight, so you could do that prep the evening before or even the morning of the day you plan to serve these yummy tacos.
Zesty Margarita Chicken Tacos


I tweaked the recipe, adding a few extra goodies to the flavorful marinade. I also included a spicy-tangy cream drizzle, caramelized Maui onions, crumbled queso fresca, and tangy tomato. These tacos are flavored with non-alcoholic margarita mix in the marinade, which you can find in the mixer aisle of most grocery stores. Make sure to allow at least two hours for the chicken to marinate in the fridge. It can marinate up to overnight, so you could do that prep the evening before or even the morning of the day you plan to serve these yummy tacos.
Zesty Margarita Chicken Tacos
with Spicy Chipotle-Lime Drizzle
adapted from 300 Best Taco Recipes

Step 1: Make the marinade by combining the following ingredients in a large bowl: the juice of one navel orange, the juice of one lime, 1/4 cup olive oil, 1/2 cup bottled margarita mix (I used Jose Cuervo brand), 1 tbs. honey, 1 tbs. finely chopped shallot, 1 tsp. salt, 1 tsp. lemon pepper, 1 tsp. dried cilantro, and a generous pinch of red pepper flakes. Whisk to combine and add 1.5 lb. boneless chicken breast. Marinate in the fridge at least 2 hours before grilling.
Step 2: Make the creamy drizzle sauce by combining the following ingredients in a bowl: 1 container nonfat Greek yogurt, 1/2 cup mayo, the juice of one lime, 1-2 tbs. chipotle puree from a can of chipotle peppers, and 1 tsp. dried cilantro. Whisk to combine, and refrigerate until youre ready to assemble the tacos.
Step 3: After the chicken has marinated, add 2 tbs. olive oil to a cast-iron grill pan over med-high heat...or fire up your outdoor grill. When the pan is hot, add the chicken breast and cook thoroughly. Let rest for 5 minutes, then slice into strips. While the chicken grills, slice a sweet Maui onion into rounds and caramelize in a skillet with 1 tbs. olive oil.
Step 4: To assemble the tacos, layer the following ingredients onto warmed flour tortillas: sliced avocado, slices of the grilled chicken, some of the caramelized onions, chopped tomato, queso fresca, and some of the creamy drizzle sauce. Roll up...and eat!

This recipe is a keeper! The chicken cooks up very moist, and the marinade gives it a fantastic citrusy flavor. The other components in the taco work very nicely together and provide a nice color contrast too. That chipotle-lime drizzle is really good, and it adds just enough spicy heat to compliment, without overwhelming, the other ingredients! This amount of meat is enough to make 7-8 tacos, so adjust accordingly...depending on how many hungry people you need to feed.
This recipe is a keeper! The chicken cooks up very moist, and the marinade gives it a fantastic citrusy flavor. The other components in the taco work very nicely together and provide a nice color contrast too. That chipotle-lime drizzle is really good, and it adds just enough spicy heat to compliment, without overwhelming, the other ingredients! This amount of meat is enough to make 7-8 tacos, so adjust accordingly...depending on how many hungry people you need to feed.
Subscribe to:
Posts (Atom)