Showing posts with label green. Show all posts
Showing posts with label green. Show all posts
Saturday, February 14, 2015
Halloween Spookyfood with Friedas Produce Featuring Spicy Purple Sweet Potato Oven Fries with Green Goo Dipping Sauce


Spicy Purple Sweet Potato Oven Fries
with Green Goo Dipping Sauce
adapted from Frieda’s…and a Friend’s Spicy Ranch

Ingredients for 2-3 servings:
For the oven fries:
- 1 large Stoke’s purple sweet potatoes, peeled
- 2 tbs. olive oil
- 1 tsp. finely chopped parsley
- 2 cloves garlic, finely minced or grated
- 1 tsp. dried cilantro
- 1 tsp. chili powder
- Sea salt and cracked black pepper to taste.
For the Green Goo Dipping Sauce:
- 8 ounces light sour cream
- ½ cup mayo
- 1 packet ranch dip mix
- 2 tbs. chopped cilantro
- 1 jalapeno, seeds and membranes removed
- 3 green onions, cut into rough pieces
- Juice of 1 lime
- 2 tbs. water
- 1 tbs. olive oil
Directions:
Step 1: Preheat oven to 400. Line a large rimmed baking sheet with foil or parchment; set aside. Cut the sweet potato into matchstick pieces 1/2-inch wide. For even cooking, try to get the pieces even thickness. Combine the olive oil, parsley, garlic, cilantro, and chili powder in a large bowl. Add the sweet potatoes and toss to evenly coat with the seasoned oil.
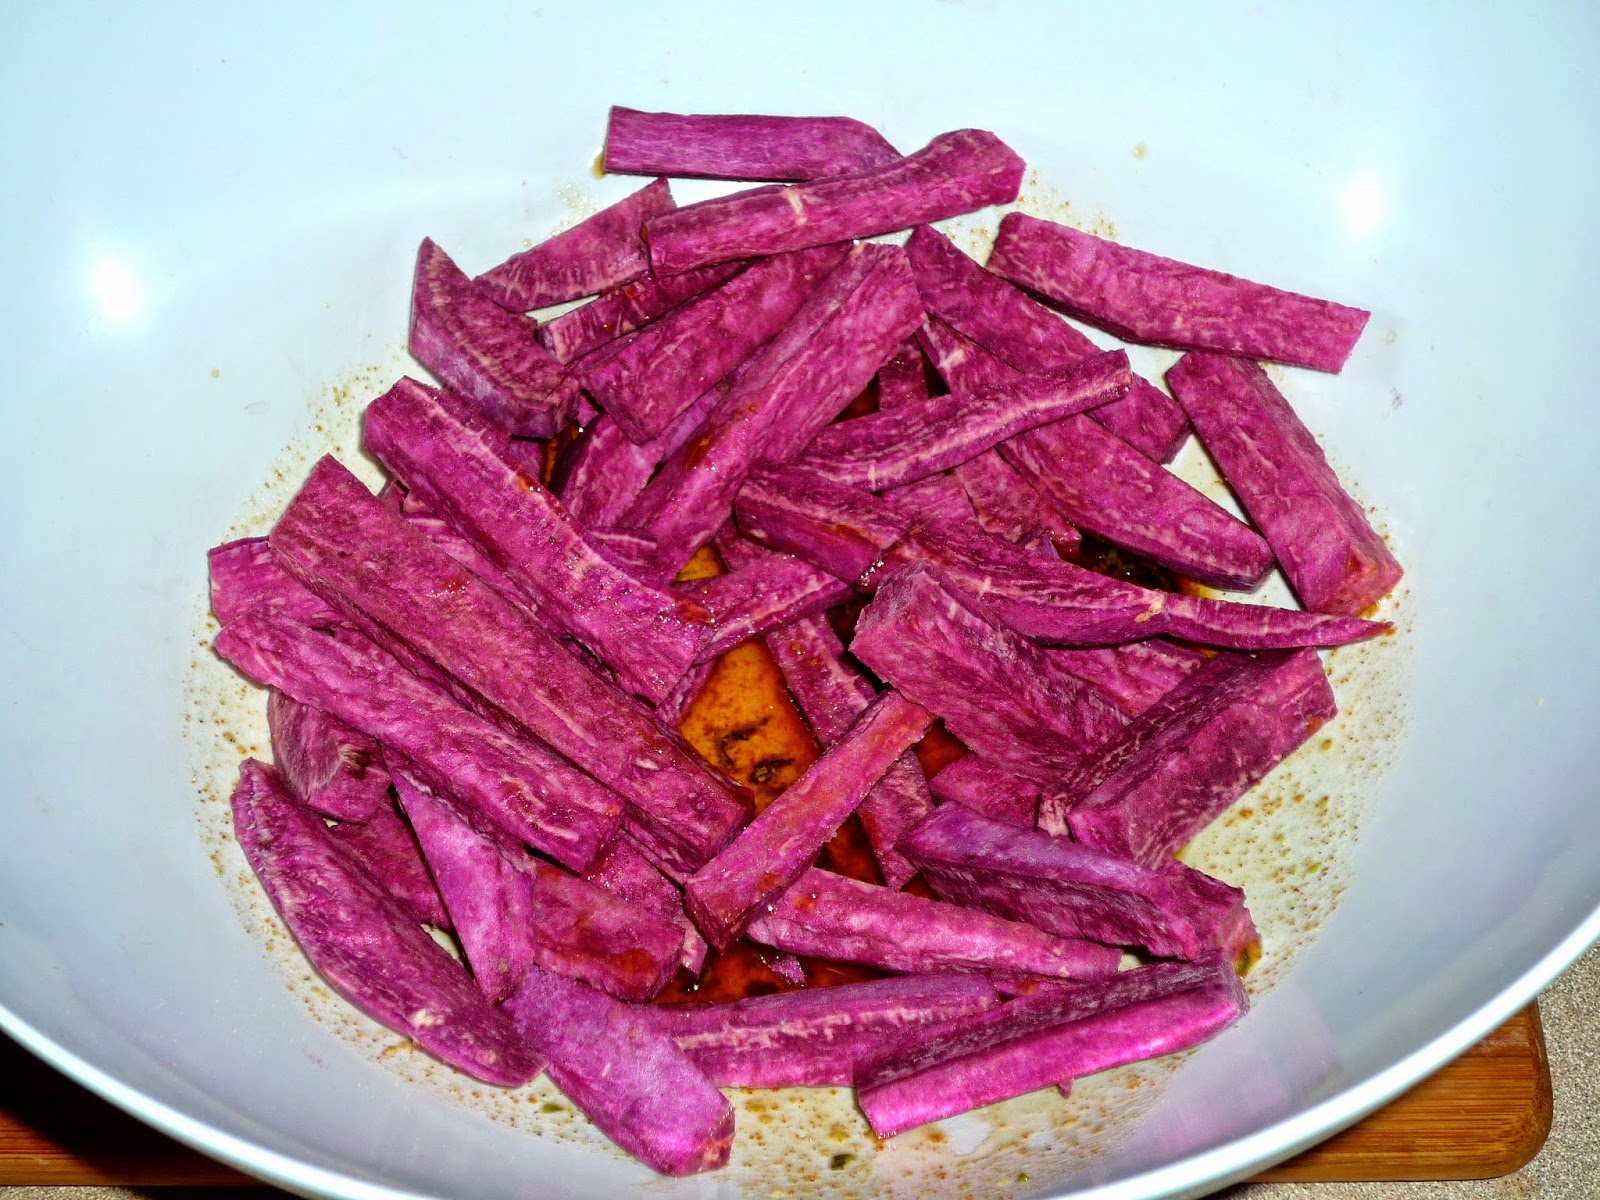 Step 2: Arrange the sweet potato fries on the rimmed baking sheet and sprinkle with salt & fresh ground pepper to taste. Bake for 20 minutes, then carefully flip them with a spatula. Add salt & pepper to the other side of the sweet potatoes and cook for an additional 10-15 minutes. The sweet potatoes should be browned and cooked through.
 Step 3: While the sweet potato fries bake, prepare the dipping sauce. Add the water, olive oil, and lime juice to a blender or small food processor. Top the liquid ingredients with the cilantro, jalapeno, and green onions. Process until the ingredients form a green puree. Add the sour cream, mayo, ranch dip mix, and green puree to a large mixing bowl. Stir well to combine and spoon into a bowl – I used a small metal “trick or treat” bucket from Dollar Tree!


 Step 4: To serve, place the sweet potato fries on a colorful Halloween platter. The plastic spiders I inserted among the fries are totally optional, but theyre a fun surprise when you bring the fries to the table! Serve the sweet potato fries with the container of “green goo” on the side for dipping.
 This is such a fun Halloween side – but it can be enjoyed anytime of the year! The sweet potato fries are lightly crispy, with a bright purple interior. The spice level is moderate, allowing the mellow sweetness of the potatoes take center stage. And the “green goo”? It provides an amazing burst of flavor! It’s moderately spicy and a little tangy -- with the familiar flavor of ranch shining through.
If you prefer your dip on the milder side, use only half of a seeded jalapeno – or leave it out all together. I won’t tell! The leftover "green goo" also makes an excellent dip for crispy tortilla chips. I also like to use it as a spread on top of chicken sandwiches or cheeseburgers. I hope youll give this fun recipe a try for Halloween...and let me know how your friends and family enjoy it!
Disclosure: Friedas provided me with Stokes purple sweet potatoes to facilitate this post. All opinions expressed are solely my own.
If you prefer your dip on the milder side, use only half of a seeded jalapeno – or leave it out all together. I won’t tell! The leftover "green goo" also makes an excellent dip for crispy tortilla chips. I also like to use it as a spread on top of chicken sandwiches or cheeseburgers. I hope youll give this fun recipe a try for Halloween...and let me know how your friends and family enjoy it!
Disclosure: Friedas provided me with Stokes purple sweet potatoes to facilitate this post. All opinions expressed are solely my own.

Monday, February 9, 2015
Fresh Take On Dinner with Green Giant Steamers Featuring 15 Minute Chicken and Veggie Couscous Skillet


Take Pasta Night for example. Instead of having plain jarred marinara sauce and pasta, simply add Valley Fresh Steamers Market Blend Vegetables. Voila – you’ll have Spaghetti Veggie Bolognese in no time flat! You have a completely new take on a classic dish by simply adding one healthy new ingredient.

15-Minute Chicken and Veggie Couscous Skillet
a Weekend Gourmet Original

Ingredients:
- 1 package Green Giant Steamers Healthy Vision blend
- 7-ounce package Garlic and Olive Oil couscous mix
- 1 small shallot, thinly sliced
- 6 ounces chopped cooked chicken breast
- 2 ounces feta cheese, crumbled [NOTE: You can sub crumbled goat cheese if you prefer]
Directions:
Step 1: Cook the couscous mix according to the package directions, adding the sliced shallot. While the couscous cooks, prepare the the Green Giant Steamers according to the package directions.

Step 2: When the couscous is cooked, give it a quick fluff with a fork. Add the Green Giant Steamers and chicken breast. Stir well to combine. Sprinkle the crumbled feta on top. Serve the meal directly from the skillet.
 That’s it! Quick-cook ingredients let you have this big-flavor skillet dinner on the table in a matter of minutes. The couscous was perfectly seasoned with garlic, olive oil and shallot. The rosemary-infused butter sauce from the Steamers provides another layer of seasoning to the dish. The feta adds a tangy, salty flavor profile that works perfectly with the couscous and chicken. This is a filling dish that no one will believe you pulled together in less than 30 minutes. If you want, that can be our little secret!
Disclosure: Information and a Green Giant prize pack have been provided by General Mills through Platefull Co-Op. All opinions expressed are my own.
Sunday, February 8, 2015
Chicken Strawberry Field Green Salad with Strawberry Balsamic Dressing for SundaySupper Spring Recipes
After a two-week hiatus, Im so excited to be taking part in this weeks #SundaySupper! Our theme this week fits perfectly with the warm temps weve been having in Central Texas this week: Spring Recipes, hosted by Mamas Blissful Bites. Were in the 80s this afternoon, with a couple of 90-degree afternoon in the forecast this coming week...eek! Im not sure that Im quite ready for Summer-like temps in March. Warmer afternoons means that its time to start eating lighter foods with a focus on lots of fresh fruit and veggies...including salads like my Chicken-Strawberry Field Green Salad with Strawberry Balsamic Dressing.

For Michael to be ok with having a salad for our dinner, it has to feature protein and lots of fun ingredients that fill you up...without filling you out. Our blog trip to New York is coming up in about 6 weeks, so were trying to eat lighter to make some "eating room" in our clothes! Flavor-packed salads like this one make that so much easier! This is my spin on a recipe I found at the Cooking Light website. I added some avocado and crispy wonton strips...and I subbed in different cheeses and nuts than the original recipe called for. You can use your favorite bottled dressing, but the simple homemade vinaigrette can be whipped up in about 2 minutes.
Chicken-Strawberry Field Green Salad
with Strawberry Balsamic Dressing
adapted from Cooking Light

Step 1: Make the dressing by adding the following ingredients to a small bowl: 1 tbs. sugar, 1 tbs. water, 2 tbs. olive oil, salt and pepper to taste, and 2 tbs. balsamic. NOTE: I used fabulous artisan olive oil and sweet strawberry balsamic from Con Olio in Austin. Whisk well and set aside while you prep the rest of the salad.

Step 2: Add the following ingredients to a large bowl: one bag of baby field greens, 6-8 quartered strawberries, and 1/4 cup thin slivers of red onion. Add the dressing and toss well to combine. Divide the greens between 2 or 3 plates. Top each salad with the following ingredients: sliced chicken breast (you can pan sear or just buy roasted deli chicken), sliced avocado, pecan pieces, feta cheese, and crispy wonton strips.

This salad is loaded with flavors -- seasoned chicken, tangy-sweet strawberries, and creamy avocado work perfectly together. The homemade dressing is sweetly tangy and so easy to make. Best of all, this salad can be ready to eat in about 15 minutes if you start with roasted deli chicken! I made the dressing and pan-seared the chicken, and it was still ready to eat in less than 30 minutes. Feel free to sub in gorgonzola for the feta...and use any nut that you have on hand. This salad is pretty flexible, so have fun and use what you love.
I hope youll check out all the fabulous Spring-inspired recipes that my fellow #SundaySupper participants are sharing today. From breakfast to dessert, and everything in between, weve got you covered. Be sure to join us for a Twitter chat this evening at 600 CST...well be discussing Spring foods and recipes, and its always a good time!
Breakfast
- Baked Eggs with Shaved Asparagus and Proscuitto by The Girl In The Little Red Kitchen
- Shrimp and Leek Quiche by Gourmet Drizzles
- Spinach and Cheddar Quiche for St. Patrick’s Day Brunch by Supper For A Steal
- Asparagus and Spring Onion Frittatta by Country Girl in the Village
- Savory Crepes with Prawns, Broccoli and Hollandaise Sauce by Masala Herb
- Egg Bake with Spring Onions, Asparagus and Artichokes by The Whimpy Vegetarian
Apps, Bread, Salads, Soups and Dressings:
- Gluten Free Irish Soda Bread by The Meltaways
- Strawberry, Avocado, Spinach Salad with Strawberry Vinaigrette by Daily Dish Recipes
- Asparagus Gazpacho by The Not So Cheesy Kitchen
- Spinach Bacon Salad by In The Kitchen with Audrey
- Anchovy and Egg Salad by Pescetarian Journal
- Sweet and Sour Cabbage Soup by Fast Food to Fresh Food
- Asparagus Red Pepper Salad by No One Likes Crumbley Cookies
- White Asparagus & Salmon Spring Salad by Family Foodie
- Chicken-Strawberry Field Green Salad w/Strawberry Balsamic Dressing by The Weekend Gourmet
- Bacon & Egg Spring Salad by Daddy Knows Less
- Green Garbanzo Hummus by Soni’s Food
Main and Sides:
- Pea Shoot Risotto by Small Wallet, Big Appetite
- Creamy Meyer Lemon Pasta by Juanita’s Cocina
- Sweet Ginger Scallion Noodles by What Smells So Good?
- Asparagus Pesto w/Heirloom Fingerlings and Orecchiette by Webicurean
- Coddle for St. Patrick’s Day by Noshing With The Nolands
- Corned Beef Cabbage Rolls by Curious Cuisiniere
- Brown Butter Brussels Sprouts with Gruyère and Hazelnuts by Hip Foodie Mom
- Raw Cucumber Sandwich with Avocado and Spinach Sauce by Mama’s Blissful Bites
- Berry Tacos by Peanut Butter and Peppers
- Asparagus and Prosciutto Bundles by Diabetic Foodie
- Caramelized Grapes and Brie Whole Wheat Galette by Vintage Kitchen
- Pink Water Kimchi (Nabak Kimchi) by Kimchi Mom
Desserts:
- Key Lime Cheesecake by The Foodie Army Wife
- Irish Coffee Ice Cream with Caramel Whiskey Sauce by 30A Eats
- Key Lime Cream Cheese Empanadas by La Cocina de Leslie
- Coconut Raspberry Layer Cake by Gotta Get Baked
- Fresh Mango Berry Mousse With Coconut Cream by Sue’s Nutrition Buzz
- Gluten Free Carrot Cookies by Simply Gourmet
- Chocolate Mint Brownies by Hezzi-D’s Books and Cooks
- Strawberry Sorbet by Magnolia Days
- Cadbury Creme Egg Pull-Apart Sweet Rolls by Chocolate Moosey
- Strawberry Cheesecake Parfaits by That Skinny Chick Can Bake
- Meyer Lemon Ice Cream Sandwiches by Cravings of a Lunatic
- Lemon Roll Cake by The Ninja Baker
- Blueberry Cheesecake Ice Cream by Kudos Kitchen by Renee
- Candied Flowers by Cindy’s Recipes and Writings
- Lemon Citrus Cookies by Mom’s Test Kitchen
- Mini Fruit Tarts by Big Bear’s Wife
- Chocolate Pudding with Irish Cream by Buffy and George
- Fried Ice Cream by Neighborfood
- Watergate Salad by Cupcakes and Pearls Blog
- Good-for-You Strawberry Tiramisu Cheesecake Cups by Cupcakes & Kale Chips
Beverages:
- Guinness Beer Milkshake by The Urban Mrs
- Wines to Pair with Springtime #SundaySupper Dishes by ENOFYLZ Wine Blog
- Irish Spring Tea Party by My Cute Bride
- Fizzy Citrus Cocktails by The Messy Baker
Friday, February 6, 2015
Summer Breeze Corn Salad and a Green Giant BlogSpark Prize Pack Giveaway

For many people, the upcoming Memorial Day weekend is the unofficial kickoff to summer! Here in Texas, we start warming up in April…so we’re already wearing our capris and getting pedis so we can wear sandals. And? We’re also eating lighter food. Being a food blogger has had one unintended side effect: a "few" extra unwanted pounds! As a result, I’m making an effort to cook and share more light options with yall. To help make eating healthier easier, the folks at MyBlogSpark teamed up with Green Giant and Weight Watchers to send me a prize pack that helps make eating light on-the-go much easier.

Veggies are an important part of a healthy lifestyle, so I make an effort to eat my recommended five servings of fruits and veggies each day. It’s not always easy, but Green Giant Steamers are really convenient for me. I just pop ‘em in the microwave, and they’re ready to eat in a matter of minutes. FYI...Green Giant is the only frozen vegetable brand to be endorsed by Weight Watchers, and most of their 30 varieties are only 1 or 2 PointsPlus per serving. You can even visit http://bit.ly/greengiantcoupon to download a printable coupon for $.60 off the purchase price of two boxes of Weight Watchers endorsed Green Giant Boxed Vegetables.
I decided that I wanted to create a healthy and refreshing salad using the white shoepeg corn that I purchased with my coupon. This is my riff on one of my favorite summer salads that my mother-in-law serves with grilled steak. Her salad combines tomato, cucumber, avocado, and purple onion tossed with store-bought Italian dressing. I made two tweaks to her recipe: I added sweet shoepeg corn to the veggies, and I made a homemade vinaigrette featuring lime juice, heart-healthy olive oil, and a bit of cilantro.
Summer Breeze Corn Salad
adapted from my mother-in-law

Step 1: Add the following ingredients to a large mixing bowl: 1 thawed package Green Giant Steamers White Shoepeg Corn, two small chopped tomatoes (seeded), 1/4 cup finely diced purple onion, 1 small seeded chopped cucumber, and 1 diced avocado.


Step 3: Pour the dressing over the veggies in the bowl and stir well to combine. Be gentle so you dont break up the avocado too much, especially if its very ripe! Refrigerate for at least 30 minutes to let the flavors combine before serving.


This refreshing salad takes 15 minutes max to toss together, but it’s the perfect for summer: light and bursting with flavor! The creamy avocado and crunchy cucumber plays really nicely against the sweet corn...and the cilantro and lime in the dressing give it a bit of zest! This salad is best served the same day in order for the avocado to look its best, but I like to make it 1-2 hours before serving to let the flavors combine just a bit. I served this with simple marinated grilled chicken breast and rice pilaf for a fantastic simple supper.
So...who wants to win one of these fun prize packs from MyBlogSpark? Simply comment below telling me which vegetable you would choose with your free coupon...and how you would use it in a healthy summer dish. Ill accept entries until 1159 PM this Friday...and Ill announce the winner this weekend.
Thursday, February 5, 2015
Kitchen Sink Frittata Featuring Red Gold Petite Diced Tomatoes with Onion Celery and Green Pepper
 My friends at Red Gold Tomatoes recently sent me two cans of their Petite Diced Tomatoes flavored with Onion, Celery, and Green Peppers so I could share an easy weeknight dinner recipe with you. I decided to use the tomatoes to play a game of what I like to call Chopped: Home Edition, my personal spin on my favorite Food Network show. That’s where I create a dinner using only the ingredients I have on hand in my kitchen. It was hot, my sprained ankle was sore after work, and I was tired. Bottom line: I just didn’t feel like stopping at the store on my way home to pick anything up. Instead, I looked at what was in the pantry and fridge that would pair well with the tomatoes. I created my breakfast-for-dinner Kitchen Sink Frittata using eggs, potatoes, onion, flat-leaf parsley, prosciutto, and cheese that I had on hand. After it came out of the oven, I topped it with a mixture of the petite diced tomatoes, a bit of my favorite marinara sauce, and some grated parmesan. It was a complete meal in one skillet!
I love frittatas, because they’re so much easier to make than an omelet…to me at least. There’s no stressing out over trying to perfectly fold it…simply sauté your ingredients, pour the egg custard over the top, and pop it into the oven. That gives you a pocket of time to whip up a nice side dish, then all you do is cut into wedges and serve! For this frittata, I served a combination of berries topped with a mixture of strawberry Greek yogurt and strawberry preserves and a sprinkle of granola. It was a simple and healthy dinner that I had ready in just over 30 minutes start to finish.
Kitchen Sink Fritatta
a Weekend Gourmet Original

Step 1: Preheat oven to 375. Add 1 tbs. olive oil to an oven-safe non-stick skillet over med-high heat. When the skillet is hot, add 2 peeled red potatoes that have been cut into a ¼-inch dice, along with salt and pepper to taste. Cook, stirring every few minutes, until the potatoes start to brown – about 10 minutes. Add half of a small yellow onion thats been diced, and 3 pieces of prosciutto (or other thin-sliced ham) thats been cut into bite-sized pieces. Give it a stir and cover to steam the onion and potato. Cook for about 5 minutes, then uncover and give the mixture one stir. By now, the potatoes should be nearly cooked and the onion golden-brown.

Step 2: Make the egg custard by adding the following ingredients to a large measuring cup: 5 eggs (I use Eggland’s Best), 1/3 cup skim milk, ½ cup grated parmesan, 2 tbs. chopped flat-leaf parsley, and salt & pepper to taste. Whisk well to combine, then evenly pour the egg mixture over the ingredients in the skillet. Sprinkle with ½ cup diced or shredded 2% cheese of your choice; I used a combo of 2% cheddar and jack chunks.

Step 2: Make the egg custard by adding the following ingredients to a large measuring cup: 5 eggs (I use Eggland’s Best), 1/3 cup skim milk, ½ cup grated parmesan, 2 tbs. chopped flat-leaf parsley, and salt & pepper to taste. Whisk well to combine, then evenly pour the egg mixture over the ingredients in the skillet. Sprinkle with ½ cup diced or shredded 2% cheese of your choice; I used a combo of 2% cheddar and jack chunks.
Step 3: Place the skillet in the oven and cook until it begins to puff and turn golden, about 10 minutes. I like to turn the skillet around in the oven halfway through baking to make sure it cooks evenly. While the frittata is baking, add the following ingredients to a saucepan over medium heat: 1 can well-drained Red Gold Petite Diced Tomatoes with Onion, Celery, and Green Pepper, 1 cup jarred thick marinara sauce, and 1/3 cup grated parmesan. Stir to combine and heat until bubbly. When the frittata comes out of the oven, use a slotted spoon to carefully place the tomato mixture in the center of the frittata in a circle. To serve, cut the frittata into wedges.


For something that was created using bits and pieces that I had in my kitchen, this frittata was outstanding! The freshness of the Red Gold Tomatoes worked really nicely with the smoky prosciutto and earthy potatoes. Michael asked for seconds…and thirds...of this, so you know it’s a keeper. This basic formula can be used to create an infinite variety of frittatas…just use whatever veggies, meat and/or cheese you have on hand on a given day. I served this frittata with a berry-yogurt parfaits, but biscuits or toasted English muffins would be great too. I always have a can or two of Red Gold Tomatoes in my cupboard, because they allow me to whip up tasty weeknight dinners like this in a matter of minutes.
Disclosure: Red Gold sent me two cans of their Petite Diced Tomatoes to facilitate this post. However, the opinions expressed are my own.
Monday, February 2, 2015
Spicy One Dish Goodness That Green Sauce Spicy Chicken and Rice Featuring HEBs Primo Pick That Green Sauce

I’m so excited to announce my new partnership with Texas-based grocery chain HEB! Starting with today’s post, The Weekend Gourmet is going to be featuring one of their Primo Picks each month. Primo Picks are unique, tasty and cool products you likely have never heard of or tried before – some of them unique to HEB. Each month, I’ll introduce the featured product, share my thoughts, and showcase a recipe using the product as an ingredient. I’m kicking things off with an HEB-brand product: their addictive That Green Sauce.

That Green Sauce is a dip/sauce that is made from jalapenos and other ingredients. It is indeed green, and it packs quite a punch…more than I was expecting, actually! It’s labeled Medium on the jar, but I would personally place it more in the Hot category. It’s spicy, delicious, and addictive! You can eat it right out of the jar with tortilla chips for a snack, pour it over scrambled eggs at breakfast…or you can use it to create a spicy one-dish dinner! I decided to make a spicy version of a comfort classic: chicken and rice. My That Green Sauce Spicy Chicken and Rice is perfect for busy weeknights. Once you mix the ingredients up, the oven does the rest of the work. I used a double shot of That Green Sauce: to flavor the rice AND spread on top of each chicken breast to give the dish some extra kick.
That Green Sauce Spicy
Chicken and Rice
a Weekend Gourmet original

Step 1: Preheat oven to 375. Salt and pepper 1 lb. boneless chicken breasts. Brown chicken on both sides in a skillet with a bit of olive oil over med-high heat. Reserve while you assemble the rest of the dish. Combine the following ingredients in a large mixing bowl: 1 can reduced-fat cream of chicken soup, ½ cup HEB That Green Sauce, ¾ cup converted white rice, ¾ cup frozen corn kernels, 1/3 cup finely chopped onion, 1 tsp. cumin, 1 tsp. coriander, 1 tsp. dried chives, and 1 tsp. chili powder.

Step 2: Stir well to thoroughly combine and spoon into a 13x9 pan or a casserole dish. Place the reserved chicken breasts on top of the rice mixture, cover tightly with foil, and bake for 45 minutes.

Step 3: Remove the foil from the pan and spoon some That Green Sauce on top of each chicken breast and sprinkle with a generous amount of co-jack cheese. Salt and pepper to taste and place back in the oven for 15 minutes, until the cheese is bubbly. To serve, place some of the rice mixture on a plate and top with one of the cheese-topped chicken breasts.


This simple, comforting dish earned high marks from Michael…he said the spice level was perfect and asked for seconds. Husband-approved is always a good sign! For me, the heat of the sauce was tempered just enough by the other ingredients in the dish to notice the heat…but not enough for it to overpower. The rice is creamy, and I loved the addition of corn for texture and flavor.
The chicken stayed moist and juicy and was full of flavor thanks to a smear of That Green Sauce and the melted cheese on top. This recipe’s a keeper! You can find That Green Sauce at all Texas HEB grocery stores. It’s delicious and versatile, so you can bet I’ll be keeping a jar of it on hand in my kitchen at all times! I’m thinking it will make a great component for a really good tortilla soup this winter…
Disclosure: HEB provided me with a jar of That Green Sauce to facilitate this post. My opinions are my own.
Subscribe to:
Posts (Atom)