Showing posts with label of. Show all posts
Showing posts with label of. Show all posts
Thursday, April 16, 2015
Behind the Scenes of a Television Cooking Segment The Weekend Gourmet Cooks on Great Day SA!
 |
| Its 15 minutes until the show goes live, so Im busily putting the finishing touches on my prep work in the KENS 5 kitchen set. |
Most of yall dont know this, but I have a background in broadcasting. During college, my undergrad degree was in Radio, Television, and Film. Ive worked for a variety of radio stations...and I dabbled in a bit of TV back in the day as well. I also love public speaking, so its a dream come true to appear on a professional television broadcast!! This time, they asked me to focus on a light and healthy summer meal...so I shared my yummy Pollo Confetti Chef Salad. I thought it might be fun to share some behind-the-scenes pictures that Michael snapped, along with some information about everything that goes into preparing for a 4-to-5-minute television cooking segment.
 |
| Five minutes before the show starts, the ingredients are laid out...the decor is set up, and a finished salad is on display. |
The alarm goes off at 600...I need time to do full hair and makeup and load up the car before we leave at 730. The show airs live at 900 each morning, and guests are asked to arrive at 800 to set up. Let me tell you, the time goes by QUICKLY!! There are tons of lights, cameras, and monitors on the set...and lots of production staff running around getting ready for the show. As I prep my ingredients and decorate the kitchen set, the producer tells me that Ill be up after the opening segment and first commercial break. Host Paul Mireles stops by to discuss what questions hell ask...and I let him know that Im going to have him help me assemble the salad as we chat.
 |
| The view of the Great Day SA set from the audience point of view. Notice multiple cameras, monitors, and crew. Ralph, the producer, is in the Spurs Ginobili jersey. His job is to keep this controlled chaos organized! |
The audience is seated about 15 minutes before the show starts. Im mostly set up by then, so its time to go into the production booth to verify the spelling of my name and the blogs url for the pop-ups that will be inserted during my segment. Then, its off to the dressing room to powder my nose, fluff and spray my hair, and put on my apron. Not only does the camera add 15 lbs. (NOT fun, by the way...), but the bright studio lights can really make you look washed out -- especially when youre as fair as I am! That means I have to wear a lot more makeup than usual, and more vibrant colors. Then? Its showtime!! During the opening segment, I make sure that everything is in place...and I just try to relax and have fun. Michael waves at me from the audience and gives me a thumbs up...hes my biggest fan!
 |
| This is a teleprompter. It is mounted to the top front of the camera, and the text crawls up as the host reads the words. |
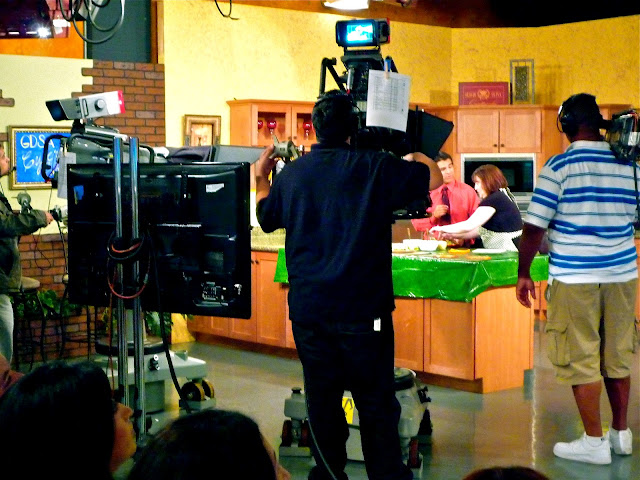 |
| In the KENS 5 kitchen with host Paul Mireles. There are three cameras and a monitor over my shoulder the entire time! Its really not as scary as it looks. I just try to think of it as hanging out in the kitchen and talking about food...and all the cameras just happen to be there! |
When the show is over, I thank the production crew for their work...chat a bit with the hosts and producer, and leave one of the finished salads for them to enjoy! Michael and I pack up my stuff, load it in the car, and get back to our normal life. Its time to head to my day job for the rest of the day...and I take the other completed salad to the office to share with my co-workers. People ask me if its scary or nerve-wracking to be on live television. I can honestly say that I find it to be a blast...and not the least bit scary. Cooking on television is such fun for me! And now...heres how the final product looked as it aired live. Now that you know what it takes to make this segment happen, tell me what you think!

Monday, April 13, 2015
Spotlight and Giveaway New Yorks Salt of the Earth Bakery

-- Everything a cookie always wanted to be. ™
Have I got a treat for you today, especially if you love sweet and salty baked goods as much as I do! Salt of the Earth Bakery is located in New York, and they have a fabulous line of cookies and brownies that are flavored with a variety of finishing salts. During our April trip to New York, I had a chance to sit down with owner Alexandra Rabbani to learn more about this history of the company and sample some of her amazing products. We featured them in our article The Sweet Side of New York. Imagine how excited I was to find out that Salt of the Earth recently began shipping most of their baked goods all over the country via their website. Now I can get my fix without having to spring for airfare to New York!! Alexandra has a vibrant personality, and shes very passionate about her products. I am a huge fan of her cookies and brownies, so Im thrilled to be able to share them with you today. Alexandra recently sent me The Whole Shebang from her online store: three flavors of cookies plus three flavors of brownies, and one of you is going to receive the same sampler as well!


Im so thrilled to share Salt of the Earth Bakery with you today. Alexandra is going to give one of you your very own The Whole Shebang sampler described above so you can try her goodies for yourself! To enter the giveaway, youll need to visit the SOTE Bakery website. Then come back and tell me which item youre most excited to try. Make sure to leave me your e-mail address, so I can find you if youre the winner. I will accept entries until Thursday 8/8 at 1159 pm CST. I will notify the winner by e-mail the following day. Good luck!!
Disclosure: Salt of the Earth Bakery sent me one of their The Whole Shebang gift packs to facilitate this feature. However, all opinions expressed are my own.
Friday, February 27, 2015
Celebrating National Ice Cream Sandwich Day With a Giveaway of the I Scream Sandwich! Cookbook

Its August, which means that The Weekend Gourmet is celebrating its third anniversary all this month...and Im planning all sorts of fun things to commemorate this milestone!! Im starting the fun off with a fabulous cookbook giveaway to celebrate National Ice Cream Sandwich Day today. Jennie Schachts I Scream Sandwich! is a new cookbook that contains fantastic variations on the ice cream sandwich theme. Some of the recipes that immediately caught my eye include the Key Lime Pie (key lime ice cream and sugar cookies), Blueberry Muffin (blueberry sorbet on blueberry muffin top cookies), and Hawaiian Holiday (pina colada sorbet on macadamia cookies)! Each recipe provides a recipe for an ice cream, sorbet or frozen yogurt filling...and the corresponding "holder." This includes cookies, brownies...and a few unexpected surprises. The book is neatly organized into themed chapters that include Classics, World View, and Holidays and Special Occasions. The recipes are creative and FUN, and the photographs are positively mouth-watering.
I especially love that Ms. Schacht provides a Take It Easy option for all of the recipes. These tips tell you how to use store-bought cookies and/or ice cream options to save time, but still stay true to the recipes flavor profile...because sometimes youve got to have an ice cream sandwich NOW! Im going to be sharing my experience making the Key Lime Pie sandwiches later this month, just in time for your Labor Day celebrations. But, I wanted to whet your appetite just a bit and celebrate National Ice Cream Sandwich Day today. If you love PB&J, youre going to flip for the PB&J Sandwich, which features peanut butter ice cream on toasted brioche...with a homemade quick berry "jam." This isnt the ice cream sandwich you grew up with...its better!
PB&J SANDWICH: Peanut Butter Ice Cream on Toast with Berry “Jam”
from I SREAM SANDWICH!
Makes (up to) 12 sandwiches

Per Author Jennie Schacht:
This is my go-to sandwich when I am jonesing for one and there are none stashed away in the freezer. Sometimes I hope not to find a sandwich there, just so I can make this one, which delights with warm toast, cool ice cream, and the reassuring flavors of childhood. With ice cream awaiting in your freezer, a sandwich need never be more than a toaster away. I make these up one at a time when the mood strikes. If you’re hosting a child’s sleep-over party or have family in town for the holidays, make all twelve at once for an easy and memorable breakfast or midnight snack. Peanut butter is personal: Choose creamy for a smooth ice cream or chunky for more texture. In either case, look for a natural-style peanut butter made from only peanuts (salt optional), with no sweeteners or gums. I prefer a mild honey such as clover or orange blossom for this ice cream.
Peanut Butter Ice Cream | gluten free
- 2 cups whole milk
- 1/2 cup (100 grams) granulated sugar
- 1/4 cup (84 grams) mild-flavored honey
- 2 tablespoons tapioca starch or cornstarch
- 1/4 teaspoon kosher salt
- 2/3 cup (160 grams) natural peanut butter
- 1 cup heavy cream
- 1/2 teaspoon pure vanilla extract
1. Whisk 1/2 cup of the milk with the sugar, honey, tapioca, and salt in a medium saucepan until no lumps remain. Stir in the remaining 1 1/2 cups milk.
2. Heat the mixture over medium-high heat, stirring with a heatproof spatula, until it begins to steam and slightly bubble at the edges. Adjust to a simmer and cook, stirring constantly, until the mixture thickens to the consistency of a cream sauce, 2 to 3 minutes longer; do not fully boil.
3. Off the heat, add the peanut butter, give it a minute or two to soften, then stir until smooth and well blended. Stir in the cream and vanilla.
4. Transfer the mixture to a metal bowl set over a larger bowl of ice and water. Stir occasionally until the mixture is cool, taking care not to slosh water into the bowl. Cover and refrigerate until very cold, at least 2 hours. Transfer the bowl to the freezer for the last half hour before spinning it.
5. Freeze the mixture in an ice cream maker according to the manufacturer’s directions. When it is ready, transfer the ice cream to a chilled container, cover, and freeze until firm, at least 4 hours or overnight.
Toast and Berry “Jam”
- 1 to 12 slices good-quality sandwich bread, such as challah, bakery white or honey whole wheat
- Unsalted butter, for spreading on the toast (optional)
- 1 to 12 tablespoons Berry Ribbon (below) OR berry jam OR fruit spread
SANDWICH!
For each sandwich, toast 1 slice of bread until it is medium dark. Trim the crusts and butter the bread if you wish. Cut the slice in half, either crosswise or diagonally, as you would a sandwich. Spread 1 tablespoon of jam on one toast half. Scoop and spread 1/4 cup slightly softened ice cream across the other half. Sandwich the two together and enjoy while the toast is warm.
Option 1, TAKE IT EASY: For each sandwich, mix 2 teaspoons of peanut butter with 1 teaspoon of honey and swirl into a scoop of softened vanilla ice cream. Use your favorite jam, jelly or fruit spread in place of the Berry Ribbon.
Option 2, DRESS IT UP: For extra peanut punch, press the sides of the sandwiches in Honey-Roasted Peanut Brittle (see book for recipe).
BERRY RIBBON TWO WAYS | gluten free, dairy free
Sweetening berries, then evaporating and thickening some of their liquid, produces a colorful ribbon that remains soft when frozen. Blueberries won’t need to be strained, as their seeds are not as prominent.
Makes about 2/3 cup, depending on the type of berries
- 2 cups (about 300 g) raspberries, blackberries, blueberries, or other berries
- 6 tablespoons (75 g) granulated sugar
- 1 teaspoon fresh lemon juice
1. Stir the berries with the sugar in a saucepan over medium heat until they soften and become very juicy, about 5 minutes.
2. Puree the mixture with an immersion blender in the pot (beware of splatters—they stain!), or transfer to a blender or food processor and puree.
3. Pass the berries through a standard- or fine-mesh strainer into a bowl, stirring and pressing until only the seeds remain; discard the seeds. Return the syrup to the saucepan and simmer until syrupy and reduced to about 2/3 cup, 5 to 8 minutes. Stir in the lemon juice. Cool completely, then refrigerate in an airtight container until cold.
-------------------------------------------------
So...who wants to win a copy of this amazing cookbook so you can whip up a batch of creative ice cream sandwiches in your own kitchen! To enter, simply leave me a comment below. Tell me you idea for the perfect creative ice cream sandwich combo, and make sure to leave your e-mail. Ill accept entries until 1159 pm on Monday 8/5. Ill notify the winner via e-mail the following day. Good luck!
Disclosure: The publisher provided me with a review copy of this cookbook to facilitate this feature. All opinions expressed are my own, and all photographs are provided by Sara Remington.
Thursday, February 12, 2015
Bring a Taste of The Big Easy to YOUR Kitchen!


One of my favorite meals to feed a crowd is my Kitchen Sink Jambalaya. It features spicy ham, andouille sausage, chicken, and shrimp...and a lot of spicy Cajun seasonings. This is the dish that I cooked the first time I appeared on Great Day SA to cook, so I promise that its a winner.

Finally, heres my Texas-Creole Crawfish Potato Salad...which was featured as part of the July 4th #SundaySupper. Its a unique spin on traditional potato salad. Its flavored with Creole mustard, lots of bacon, and crawfish tails. This recipe was featured by Zatarains on their Facebook fan page, which was a huge honor!

Ill be back from New Orleans with a new post on Monday as part of this months Secret Recipe Club reveal. Heres a hint: with football season starting, youre going to want to serve this appetizer recipe at all your game-watching parties and tailgates!
Saturday, February 7, 2015
Sneak Peek A Few of Our Favorite New York Eats!
 Im slowly easing my way back into the kitchen again after last weeks New York trip, but I promise tohave tons of great Healthy Eating recipes for you starting this weekend! But first, I wanted to share a few of our favorite foods that we experienced while in New York last week. We visited casual eateries...and fine dining establishments -- and everything in between. When we werent eating, we enjoyed the pretty Spring temperatures and took in some live music performances. All the foods we enjoyed were delicious, but a few stood out...Ill have all the details in our travelogue later this month, but I wanted to share a few teaser pics with you now.
Sweet Treats
We sampled a lot of special treats...and Ill tell you all about them in my upcoming article The Sweet Side of New York. For now, let me whet your appetite! Our first day in town, we visited Laduree to sample their flown-in-from-Paris macarons. I had heard that theyre the very best macarons money can buy, and I believe that after our tasting. The shop owner hand-selected a few flavors for us to sample. For now, let me say that the rose macaron was one of the most uniquely delicious cookies Ive ever tasted. Sigh...

We also visited a long-time favorite of ours this trip, The Doughnut Plant. These are the doughnuts by which Michael and I measure all doughnuts...for good reason. All their ingredients are made by hand, including the jams and fillings. Quality makes a difference! We met with the manager for a tasting of some of their signature and seasonal doughnuts...and chai latte. The carrot cake (bottom left) was the surprise of this bunch...it was moist and filled with cream cheese filling. Paired with the chai, it got our day off to a perfect start!

We visited Thomas Kellers per se after the Lincoln Center Jazz Orchestra Show...both venues are located in Time-Warner Center, so it made for a great date night! The $295/person dinner was a bit out of our price range, but they offer an amazing 5-course dessert tasting for $65 in their Salon overlooking Columbus Circle. That price includes two sweet amuse bouche, 5 creative dessert courses, and chocolates at the end. The portions were perfect for Michael and I to share. It was an unforgettable experience that I cant wait to share with you. For now, Ill share my favorite course: Poached Vanilla Meringue with Champagne Mango and Rice Pudding. It was creative and outrageously delicious!

Savory Dishes
Another New York "must" for Michael and I is Shake Shack. This is not your typical fast-food burger, though. The quality of ingredients is superior, and they cook it to perfection. No trip to New York is complete for us without a Shack Burger and fries. This time, we met with their Marketing Rep at the original Madison Square Park location. We chatted with him and enjoyed our burger as we watched the line snake around the park. Were not the only ones who love these burgers!

Another favorite of ours is pizza...we visited Motorino this trip, which is consistently named among the top pizzas in the city. We shared a Soppressata Picante pizza; if youve never had soppressata, it reminded me a bit of pepperonio with an extra kick. The pizza was spicy and perfectly cooked in the wood-fire oven.

Finally, we visited Normas at Le Parker Meridien Hotel for breakfast our first day in town. Its considered one of the best breakfasts in New York, so we were excited to try it. We ordered one sweet entree and one savory and shared them. For the savory entree, we ordered the Normalitas Huevos Rancheros. It was so good! The spice level was good, the eggs were cooked perfectly, and all the individual components were delicious. Together, they made one of the best breakfast dishes wed had in ages.

I hope you enjoyed this sneak preview of some of the food that we enjoyed during our visit to New York. Ill have the travelogue up later this month, as well as two breakout articles in early July. One breakout article will feature two ideas for romantic New York date nights, and the other will showcase the best bakeries and sweet treats in the city.
Friday, February 6, 2015
Introducing Totally Bamboos New United States of Bamboo Cutting Board Line!

One of the most important tools that any serious cook needs to have in their kitchen is a good-quality cutting board. A necessity in the preparation of almost any meal, this lowly rectangular slab of plastic or wood went about its job with little fanfare or style for years. Until now, that is. Totally Bamboo has changed all that, elevating a mundane kitchen utensil into something fun and functional. They recently Introduced their “United States of Bamboo,” featuring 50 different cutting boards representing each state. “We designed these cutting boards to be both fun and practical,” said Tom Sullivan, co-owner of Totally Bamboo. “On the practical side it is a very functional cutting board that will serve the kitchen well. On the fun side, well that’s pretty obvious." In keeping with Totally Bamboo’s mission to use only sustainable natural materials, each of these state-inspired cutting boards is made from 100% renewable bamboo.
Totally Bamboo introduced the first bamboo cutting boards more 12 years ago. Bamboo is a lightweight, tough and sustainable product that is an excellent alternative to the world’s dwindling supply of hardwoods from which traditional cutting boards are made. Each of their cutting boards is full of natural rich wood colors brought out by the natural caramelization of the sugars found in bamboo.

Totally Bamboo recently sent me a fun Texas-shaped cutting board from the line, and I am absolutely loving it! Not only does it work great as a cutting board for chopping veggies…it’s also perfect for entertaining. I recently used mine as a serving board for cheese and crackers at a party, and my guests went nuts for it. Let’s face it, us Texans love our state…and this cutting board lets me display my Texas Pride! These bamboo cutting boards also make great gifts for family and friends who love to display their state pride. Whether you’re from big Texas or tiny Rhode Island, these cutting boards are scaled to the same generous size. The States line of bamboo cutting boards has an MSRP of $19.99. For more information, visit Totally Bamboo’s website.
Disclosure: Totally Bamboo sent me a Texas bamboo cutting board to try out in my kitchen. The opinions expressed are my own.
Tuesday, February 3, 2015
Book Review of Gluten Free Made Easy Featuring Peanut Butter Power Balls


Today, I’m sharing my thoughts about a new cookbook that’s just hit the shelves. Gluten-Free Made Easy is written by food blogger and cookbook author Christi Silbaugh and Michele Vilseck. Christi lives in San Diego and has been eating gluten-free for several years. Her blog is Mom, What’s for Dinner, and it focuses on tasty gluten-free recipes. I’m especially thrilled to be spotlighting this cookbook, because I’ve met Christi in person and witnessed her vibrant personality and fun-loving nature firsthand! We met at Foodbuzz Fest in San Francisco in 2012, and we hit it off right away. We were part of a fun foursome of food bloggers who hung out together that weekend. We’ve stayed in touch via our blogs since then, and I was so thrilled to have a chance to receive an advance preview copy of her cookbook a couple of weeks ago.
Gluten-Free Made Easy is comprised of recipes that are family-friendly and easy to make – whether you eat gluten free or not. We don’t have dietary restrictions that require us to avoid gluten in my household, but I still found tons of eye-catching and mouthwatering recipes as I flipped through the book. When I was trying to decide which recipe to feature today, I had such a hard time. Would I go with something savory like "Kung Foo" Korean Beef , something sweet like the unique Avocado Cream Cheese Cookies…or maybe a portable breakfast or snack to tote to work? The second I saw her Peanut Butter Power Balls, I knew I had found just what I was looking for. Easy to make, healthy, delicious…and portable? Sign me up! These protein-packed snacks can be assembled in less than 15 minutes. Store them in the fridge in a covered container, and you’ve got the perfect on-demand breakfast or post-workout snack.
Peanut Butter Power Balls
from Gluten-Free Made Easy


Ingredients:
- 1 cup peanut butter [NOTE: I used crunchy peanut butter]
- 1 cup honey
- 3 cups gluten-free oats [NOTE: I used Bob’s Red Mill Gluten-Free Rolled Oats]
- 1 cup dried fruit or nuts [NOTE: I used dried cranberries]
- ½ cup ground flaxseeds
- 1 cup mini chocolate chips
- 1/3 cup vanilla protein powder (optional)
Directions:
Step 1: Add the peanut butter and honey to a large mixing bowl. Using a sturdy spatula or spoon, blend the honey and peanut butter until totally combined.

Step 2: Add the gluten free oats, dried fruit or nuts, ground flaxseeds, chocolate chips, and protein powder to the bowl. Using a hand mixer or a very sturdy spoon, mix the ingredients until they’re thoroughly combined with the peanut butter-honey mixture.


Step 3: Roll the mixture into balls roughly the size of ping pong balls. If you keep your hands slightly moist, it will help the job go much easier. Place the rolled power balls on parchment paper. To store, layer the peanut butter power balls on layers of parchment in an airtight container.


I made these tasty little bites on Sunday night so I’d have a portable weekday breakfast or quick after-work snack on hand for this week. These two-bite treats are so good, and I love knowing that they’re packed with protein and fiber! The peanut butter provides creaminess, the honey provides a touch of sweet, and the oats provide an earthy flavor and texture. The dried cranberries provide a tart chewiness….the chocolate chips add a touch of decadence. These babies are going into my regular rotation – they’re too tasty and simple not to!
You can find this fantastic cookbook online via Amazon, as well as at Barnes & Noble locations throughout the country. Christie’s publisher provided me with a second copy of Gluten-Free Made Easy to share with one of you! To enter, follow the instructions below. I’ll accept entries until 1159 p.m. this Friday (May 23rd). I’ll notify the winner via e-mail this Saturday. If you have family or friends who are trying to follow a gluten free eating plan, be sure to have them come to enter. Christie’s book is proof that gluten free doesn’t have to mean deprivation…just some new ways of cooking and baking your favorite foods.
a Rafflecopter giveaway
Disclosure: I received a complimentary review copy of Gluten-Free Made Easy to facilitate this review and giveaway. All opinions expressed are my own.
Disclosure: I received a complimentary review copy of Gluten-Free Made Easy to facilitate this review and giveaway. All opinions expressed are my own.
Review and Giveaway Babycakes Cupcake Maker The Big Book of Babycakes Cupcake Cookbook! Featuring Pumpkin Maple Mini Cupcakes with Biscoff Buttercream Frosting

Just in time for Thanksgiving, I have a fun pumpkin mini cupcake recipe to share...and a really fun gift pack giveaway! I recently received a super-cute pink Babycakes Cupcake Maker to try out in my kitchen and share my thoughts with you. This fun machine fits on the kitchen countertop and cooks eight mini cupcakes at a time…or about two dozen per recipe. Each batch of eight cupcakes cooks in about 5-7 minutes, so its pretty much instant gratification! Even better, this versatile little machine also makes muffins, mini pies, and savory mini appetizers. I also received a copy of the latest Babycakes Cupcake Maker cookbook from my friends at Robert Rose Publishing, so I decided to make a batch of Thanksgiving-inspired cupcakes over the weekend!

We had our Thanksgiving luncheon at work this week, so I decided to use the Babycakes machine to make Pumpkin Maple Cupcakes from the book, along with my slight tweak on their Hazelnut Buttercream Frosting. Instead of Nutella, I used Biscoff spread to compliment the cinnamon and nutmeg that flavored the cupcakes. This duo paired perfectly together…the cupcakes weren’t overly sweet, which really allowed the Biscoff-infused icing to shine! The Babycakes Cupcake Baker was a snap to use: simply plug in and preheat on the countertop. While the machine heated, I whipped up the simple scratch cake batter in my stand mixer. One note: the size of these cupcakes is between a full-sized cupcake and a bite-sized cupcake. That means that cupcake liners that fit the wells can be hard to find. Babycakes makes custom liners specifically for the machine, which can be purchased online. I was able to find them in packages of 100 at my local Kohl’s.
These portion-controlled cupcakes were very tasty…they baked up perfectly in the Babycakes Cupcake Maker. The machine is fun to use and comes with an instruction book, a pastry cutter for making mini pies, and an icing bag and tips. When I iced my cupcakes, I squeezed too hard and split the bag. I had to resort to icing my cupcakes the old-school way: with an offset spatula. They weren’t as fancy as using a piping bag, but I improvised by placing a glazed pecan half on top of each cupcake. It was decorative, and it also let anyone with a nut allergy know that my cupcakes had pecans inside.
Pumpkin Maple Cupcakes with Biscoff Buttercream Frosting
from The Big Book of Babycakes Cupcake Maker Recipes Cookbook

Step 1: Plug in and preheat the Babycakes Cupcake Maker. While it heats, prep the cake batter. Add the following ingredients to the bowl of a stand mixer: 1 room-temperature large egg, 1/2 cup pumpkin puree (not pie filling), 1/2 cup pure maple syrup, 1 tsp. vanilla, and 1/4 cup vegetable oil. Combine on med-high speed and beat for 1 minute.

Step 2: In a small bowl, mix together 1 1/3 cups all-purpose flour, 1 tsp. baking powder, 1 tsp. baking soda, 1 tsp. ground cinnamon, and 1/2 tsp. nutmeg, and 1/4 tsp. salt. Add the flour mixture to the wet ingredients in the mixing bowl and combine on low speed just until incorporated. Stir in 1/3 cup chopped toasted pecans.


Step 3: Place Babycakes cupcake liners into the wells in the machine...its hot, so be careful! Use a cookie scoop to fill each well with approximately 1.5 tbs. of batter. Close the top of the machine and bake for 6-7 minutes, until the tops are golden brown and a toothpick inserted in the center comes out clean. Transfer cupcakes to a wire rack to cool and repeat until all batter is used.


Step 4: When the cupcakes are cool -- about an hour -- make the icing. Combine the following ingredients in the bowl of a stand mixer: 2 tbs. softened butter, 1/2 cup Biscoff spread. Beat on medium-high speed for 1 minute, or until creamy. Gradually incorporate 1 3/4 cups confectioners sugar until blended. Add 4 tbs. whipping cream until the icing is light and fluffy. Ice the cupcakes and top with a candied pecan half for decor.


These cupcakes are totally yummy, and the portion-controlled size is definitely appreciated during the holiday season. These cupcakes are dense and moist…almost like a muffin in consistency…and the Biscoff-infused icing was divine! I can’t wait to use the Babycakes machine to make simple appetizers and maybe some holiday-themed mini brownies. The machine was easy to clean up since I used liners, and it easily stores in my kitchen cabinets between uses.
Now…who wants to win a Babycakes Cupcake Maker of their own AND a copy of The Big Book of Babycakes cookbook in time for the holidays?!?!?! I’ll be accepting entries through this Saturday, November 24th, and the winner will be notified via e-mail on Sunday, November 26th. For one entry, simply leave a comment below letting me know how you would use this versatile machine in your kitchen. For additional entries, Like Babycakes on Facebook and Follow them on Twitter. Make sure to leave me a separate comment for each entry since I’m using a random number generator to select the winner. One last thing…please be sure to leave your e-mail address on one entry so I can find you if you’re the winner.
I hope you all have a blessed Thanksgiving! I’m leaving for a quick visit with family in the Houston area after work tomorrow, but I’ll be back with a tasty and super-simple appetizer on Friday evening. I am so very thankful for the many blessings in my life…and this blog and my readers are among the most cherished gifts in my life!
Sunday, January 25, 2015
SM�RBR�D Two different types of Norwegian Smoked Salmon Open Sandwiches
An important Scandinavian contribution to modern international cuisine is the smoked salmon. The Norwegian smoked salmon dishes developed into a variety of dishes. Typically the smoked salmon is served with scrambled eggs, dill, sandwiches or mustard sauce. A long tradition in Norway is the open-face sandwich with smoked salmon.

In this blog posting we are making two different types of Norwegian Smoked Salmon Open Sandwiches. One of the main element of both open face sandwich is that the ingredients should be fresh. Both are very easy and quick to make for either, lunch, dinner or a larger SMØRBRØ. You can even cut the sandwiches into smaller appetizers. The smoked salmon sandwiches are great to cut into small appetizers. These appetizers are great for entertaining and your guests will enjoy the tasty smoke salmon. We have included our YouTube video to see how both sandwich are made too.
First Open Face Sandwich is the Smoke Salmon & Egg Sandwich
Ingredients:
The ingredients should complement one another with respect both to taste and appearance.
* 1 slice of Italian or French white bread
* European style butter
* 1 smoke salmon fillet
* slices of hard boiled egg
* sprinkle capers
* snippings of dill
* slices of tomato is optional
Instructions:
Spread the butter across either an Italian or French bread. The butter or spread helps keep the bread from drying out and absorbing liquids from toppings in addition to adding flavor.
Then add 1 smoke salmon fillet on top of the white bread. Add a couple of slices of hard boiled eggs on top. Garnish with a sprinkle of capers and snippings of dill. It is that easy!
Please note that because open face sandwiches are about appearances, it is important not to press the toppings onto each other. Just lay each item on top of each other.
Scandinavian Triva: Below are the way Nordic ways to spell smoked salmon: * Norwegian - røkt laks
* Danish - røget Laks
* Swedish - FÄRSKRÖKT
* Finnish- LAXsavustettu lohi
* Icelandic - reyktur lax
Please share and like our video. For more Scandinavian cooking videos please subscribe to our channel too! Thank you!
Second Open Face Sandwich is Smoke Salmon & Scrambled Egg Sandwich
Ingredients:
* 1 slice of Italian or French bread
* European style butter
* 1 smoke salmon fillet
* scrambled eggs
* slices of tomato
* snippings of chives
Thinly spread with European style butter on a slice of freshly cut white bread (Italian or French).
This begins the basis for artfully arranged toppings and edible garnish. Then add 1 smoke salmon fillet on top of the white bread. Lay on top of the smoked salmon the scrambled eggs. Garnish with tomato and snippigs of dill. It is that easy!
Scandinavian Trivia: gravlax translates to buried salmon.
We hope you enjoyed our video and recipe! Please be sure to subscribe to our YouTube Channel Scandinavian Today. Our channel has videos including
*how to make Danish Christmas rice pudding with cherry sauce dessert recipe (Risalamande med kirsebærsauce)
*how to make Swedish Glogg for Christmas & cold evenings! (glögg or mulled wine recipe)
*how to make aeblskiver (æbleskiver)
*how to make Danish Christmas Klejner
*how to make easy Danish cucumber salad (arguksalat)
*how to make Danish sugar browned potatoes (brunede kartofler)
*how to make Danish red cabbage (rødkaal)
These recipes are perfect for the holiday season. Please let us know what you think! Glædelig Jul and Merry Christmas♥ !
Our Scandinavian recipes including Danish, Norwegian, Swedish and Finnish are on http://.blogspot.com/
Follow us either on Twitter @, Blogger, Google+, Google Pages, Pinterest and Subscribe to our YouTube Chanel Scandinavian Today! Lets get cooking Scandinavian foods!
Read more »
In this blog posting we are making two different types of Norwegian Smoked Salmon Open Sandwiches. One of the main element of both open face sandwich is that the ingredients should be fresh. Both are very easy and quick to make for either, lunch, dinner or a larger SMØRBRØ. You can even cut the sandwiches into smaller appetizers. The smoked salmon sandwiches are great to cut into small appetizers. These appetizers are great for entertaining and your guests will enjoy the tasty smoke salmon. We have included our YouTube video to see how both sandwich are made too.
First Open Face Sandwich is the Smoke Salmon & Egg Sandwich
Ingredients:
The ingredients should complement one another with respect both to taste and appearance.
* 1 slice of Italian or French white bread
* European style butter
* 1 smoke salmon fillet
* slices of hard boiled egg
* sprinkle capers
* snippings of dill
* slices of tomato is optional
Instructions:
Spread the butter across either an Italian or French bread. The butter or spread helps keep the bread from drying out and absorbing liquids from toppings in addition to adding flavor.
Then add 1 smoke salmon fillet on top of the white bread. Add a couple of slices of hard boiled eggs on top. Garnish with a sprinkle of capers and snippings of dill. It is that easy!
Please note that because open face sandwiches are about appearances, it is important not to press the toppings onto each other. Just lay each item on top of each other.
Scandinavian Triva: Below are the way Nordic ways to spell smoked salmon: * Norwegian - røkt laks
* Danish - røget Laks
* Swedish - FÄRSKRÖKT
* Finnish- LAXsavustettu lohi
* Icelandic - reyktur lax
Please share and like our video. For more Scandinavian cooking videos please subscribe to our channel too! Thank you!
Second Open Face Sandwich is Smoke Salmon & Scrambled Egg Sandwich
Ingredients:
* 1 slice of Italian or French bread
* European style butter
* 1 smoke salmon fillet
* scrambled eggs
* slices of tomato
* snippings of chives
Thinly spread with European style butter on a slice of freshly cut white bread (Italian or French).
This begins the basis for artfully arranged toppings and edible garnish. Then add 1 smoke salmon fillet on top of the white bread. Lay on top of the smoked salmon the scrambled eggs. Garnish with tomato and snippigs of dill. It is that easy!
Scandinavian Trivia: gravlax translates to buried salmon.
We hope you enjoyed our video and recipe! Please be sure to subscribe to our YouTube Channel Scandinavian Today. Our channel has videos including
*how to make Danish Christmas rice pudding with cherry sauce dessert recipe (Risalamande med kirsebærsauce)
*how to make Swedish Glogg for Christmas & cold evenings! (glögg or mulled wine recipe)
*how to make aeblskiver (æbleskiver)
*how to make Danish Christmas Klejner
*how to make easy Danish cucumber salad (arguksalat)
*how to make Danish sugar browned potatoes (brunede kartofler)
*how to make Danish red cabbage (rødkaal)
These recipes are perfect for the holiday season. Please let us know what you think! Glædelig Jul and Merry Christmas♥ !
Our Scandinavian recipes including Danish, Norwegian, Swedish and Finnish are on http://.blogspot.com/
Follow us either on Twitter @, Blogger, Google+, Google Pages, Pinterest and Subscribe to our YouTube Chanel Scandinavian Today! Lets get cooking Scandinavian foods!
Subscribe to:
Posts (Atom)