Showing posts with label mini. Show all posts
Showing posts with label mini. Show all posts
Friday, February 13, 2015
Mom Made Foods Spotlight Featuring Taco Rice Skillet with Mini Meatballs

 The Mom Made Foods product line includes Munchies, Meals and Bites...all of which are perfectly portioned to fit small hands. Munchies are pastry pockets filled with goodies like pizza toppings and chunky apple filling, Meals include Spaghetti with Turkey Meatballs and Cheesy Mac, and Bites include a variety of fun and tasty bite-sized mini meatballs. I absolutely flipped for the Beef & Cheese Meatball Bites and knew that I had to create a family-friendly recipe that featured them! What I came up with was a very tasty and oh-so-easy Taco Rice Skillet with Mini Meatballs. It features all of my favorite taco flavors in a delicious one-dish dinner that kids of all ages will love.
Taco Rice Skillet with Mini Meatballs
a Weekend Gourmet Original

Ingredients:
- 1 tbs. olive oil
- 1/3 cup chopped purple onion
- 1 cup frozen corn kernels
- 1 1o-ounce can diced tomatoes with green chiles
- 1 5-ounce package Spanish rice [Note: I used Mahatma]
- 1 8-ounce package Mom Made Foods Beef & Cheese Meatballs
- 1 2/3 cup water
- 1.5 cups shredded co-jack cheese
- 1/3 cup store-bought pico de gallo
- 2 green onions, thinly sliced
- 1/2 small avocado, peeled and diced
- 1 cup broken tortilla chips
- Sour cream drizzle: 1/2 cup sour cream, 2 tbs. milk, 1 tsp. dried cilantro and lime juice to taste
Directions:
Step 1: Add the olive oil to a non-stick skillet with high sides and heat over med-high heat. Add the onion and cook until the onion is softened. Add the rice mix, water, tomatoes (juice and all), and corn. Stir to combine and bring to boil. Carefully arrange the mini meatballs on top of the rice. Cover and cook for 20 minutes.

Step 2: When 20 minutes have passed, turn off the heat. Sprinkle the cheese on top, recover and let sit while you prep the topping ingredients. This allows the cheese to melt and the rice to absorb any extra liquid.

Step 3: Make the sour cream drizzle by combining all of its ingredients in small bowl. Remove the lid from the casserole and sprinkle the green onions, avocado, pico de gallo and tortilla pieces on top of the cheese. Just before serving, drizzle the sour cream mixture on top. To serve, scoop into bowls.
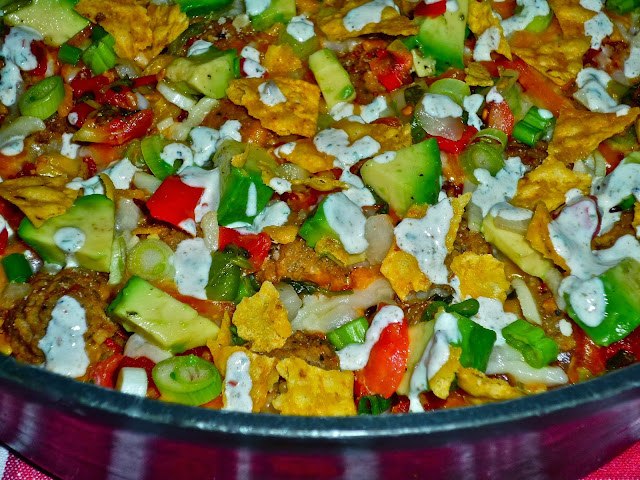
This is a fabulous one-dish meal that everyone will love! The rice is slightly spicy, and the corn and tomatoes give it some texture. We loved the bite-sized meatballs, which tasted great and were the perfect size for easy eating. The topping contained all my favorite taco ingredients...creamy avocado, spicy pico de gallo and cooling sour cream! We crushed extra tortilla chips on top of our bowls to maximize the crunch...thats optional, but highly recommended.
These versatile meatballs are tender and flavorful, and theyre very versatile. We also enjoyed them in pasta dishes and as a quick and healthy pizza topping. If youre interested in trying out Mom Made Foods for your family, you can find them in the freezer aisle of your nearest Super Target. To find Mom Made Foods at other stores near you, simply visit the Store Locator on their website and enter your zip code.
Disclosure: Mom Made Foods provided me with free product coupons to facilitate recipe development for this article. No other compensation was provided, and all opinions expressed are my own.

Wednesday, February 4, 2015
April Showers SundaySupper Featuring Mini Curry Chicken Salad Phyllo Cups
Spring has definitely sprung in Texas...that means warmer temps, longer days, and parties. April and May are prime wedding shower months, so this weeks #SundaySupper theme is April Showers...dishes that can be served at an afternoon wedding or baby shower. Our hostess this week is Brandie from Home Cooking Memories. When I think of my wedding shower, I remember the delicious finger foods that my hostesses served. Light bites that tasted great, but were light and portion-controlled. That was my thinking when I created my Mini Curry Chicken Salad Phyllo Cups.

Along with frozen puff pastry, a package of these frozen mini phyllo shells are always in my freezer. Theyre perfect for putting together a quick and elegant appetizer or dessert that looks fancy, but is ready in no time flat! For this appetizer, you make a quick chicken salad and spoon it into the thawed phyllo cups. How easy these are to whip up will be our little secret!
Mini Curry Chicken Salad Phyllo Cups
Step 1: Remove package of frozen mini phyllo shells from freezer and heat according to package directions. Add the following ingredients to a large mixing bowl: 1.5 cups finely chopped chicken breast, 1/3 cup chopped cashews, 1/3 cup raisins, and 1-2 sliced green onions.

Step 2: Add the following ingredients to the bowl: 3/4 cup fat-free Greek yogurt, 1 tsp. curry powder, and 1 tbs. agave nectar (or honey). Stir until everything is evenly combined and coated with the yogurt mixture.


I love these little bites...the chicken salad is creamy, and the chopped cashews and raisins provide a nice texture. The phyllo shells are crispy and light. If you prefer a more pronounced curry flavor, feel free to double the amount of curry powder you use...and feel free to sub in golden raisins or even dried cranberries if you prefer. This recipe makes 15 mini phyllo bites, and I had enough chicken salad left to make myself a sandwich for lunch.
Be sure to join us tonight at 600 CST for our weekly Twitter chat, where well be discussing shower planning tips and recipes. In the meantime, go check out all the fun April Shower recipes my fellow #SundaySupper contributors are sharing today!
Read more »
Along with frozen puff pastry, a package of these frozen mini phyllo shells are always in my freezer. Theyre perfect for putting together a quick and elegant appetizer or dessert that looks fancy, but is ready in no time flat! For this appetizer, you make a quick chicken salad and spoon it into the thawed phyllo cups. How easy these are to whip up will be our little secret!
Mini Curry Chicken Salad Phyllo Cups
a Weekend Gourmet Original
Step 1: Remove package of frozen mini phyllo shells from freezer and heat according to package directions. Add the following ingredients to a large mixing bowl: 1.5 cups finely chopped chicken breast, 1/3 cup chopped cashews, 1/3 cup raisins, and 1-2 sliced green onions.
Step 2: Add the following ingredients to the bowl: 3/4 cup fat-free Greek yogurt, 1 tsp. curry powder, and 1 tbs. agave nectar (or honey). Stir until everything is evenly combined and coated with the yogurt mixture.
Step 3: Spoon the chicken salad into each of the mini phyllo cups using a teaspoon. I like mine nice and full, so I mound it on top. If youre not serving these bites immediately, store the chicken salad in the fridge until you are ready to serve. This will keep them from getting mushy.
I love these little bites...the chicken salad is creamy, and the chopped cashews and raisins provide a nice texture. The phyllo shells are crispy and light. If you prefer a more pronounced curry flavor, feel free to double the amount of curry powder you use...and feel free to sub in golden raisins or even dried cranberries if you prefer. This recipe makes 15 mini phyllo bites, and I had enough chicken salad left to make myself a sandwich for lunch.
Be sure to join us tonight at 600 CST for our weekly Twitter chat, where well be discussing shower planning tips and recipes. In the meantime, go check out all the fun April Shower recipes my fellow #SundaySupper contributors are sharing today!
Starters, Appetizers & Snacks
- Pesto Tortilla Pinwheels from Home Cooking Memories
- Honey Pecan Baked Brie from Supper for a Steal
- Pinenut stuffed Dates from The Not So Cheesy Kitchen
- Glazed Pecans from Mama’s Blissful Bites
- Bloody Mary Shrimp Cocktail from A Stack of Dishes
- Mini Curry Chicken Salad Phyllo Cups from The Weekend Gourmet
- Mushroom and Feta Bites from Small Wallet, Big Appetite
- Antipasti Bites from Blueberries And Blessings
- Spinach Dip in a Pumpernickel Bowl from The Foodie Patootie
- Parmesan and Mushroom Focaccia from Basic N Delicious
Soups, Salads & Sandwiches
- London Ritz’s Tea Sandwiches from My Cute Bride
- Mini Shrimp & Egg Salad Sandwiches from The ROXX Box
- Broccoli Bacon Salad from Country Girl In The Village
- Chicken Salad on Endive from Magnolia Days
- Creamy Asparagus Soup Shooters with Shrimp from Gourmet Drizzles
- Alphabet Soup from Cindy’s Recipes and Writings
Main Dishes
- Savory Cheesy Kale Tart with Chiles from Shockingly Delicious
- Penne Ala Vodka from I Run For Wine
- Easy Baked Ziti from Momma’s Meals
- French Country Flat Pie from Webicurean
- Crustless Spinach Quiche from Family Foodie
Cakes
- Vanilla Cake with White Chocolate Buttercream from That Skinny Chick Can Bake
- Strawberry Shortcake Push Pops from Hezzi-D’s Books and Cooks
- Mini Vanilla Bean Cupcakes with Vanilla Buttercream Frosting from Damn Delicious
- Coconut Rum Cake from The Foodie Army Wife
- No Bake Lemon Cheesecakes Shots {Two Ways} from Cravings of a Lunatic
- Japanese Wedding Cupcakes from NinjaBaking.com
- Baby Blue Cake Pops from Neighborfood
- Strawberry Buttermilk Scones from Vintage Kitchen
Cookies, Brownies & Dessert Bars
- Lemon Sandwich Cookies with Pink Lemon Curd from The Girl In The Little Red Kitchen
- Chocolate Covered Mcaroons from Gotta Get Baked
- Pastel Pizzelles from Growing Up Gabel
- Chocolate-Balsamic Macaroons from Foxes Love Lemons
- Raspberry Lemonade Thumbprint Cookies from In The Kitchen With KP
- Baklava Crisps from Kudos Kitchen by Renee
- Healthy Chocolate Bars with Fruit, Nuts & Coconut from Sue’s Nutrition Buzz
- Fudgy Carob Brownies from Pies and Plots
- Pistachio Biscotti from Curious Cuisiniere
Sweet Treats
- Shortbread Maple Cream Freezer Tart from A Beautiful Bite
- Espresso Panna Cotta from Crazy Foodie Stunts
- Bite-Size Pecan Tarts from Juanita’s Cocina
- Brigadeiros from Food Lust People Love
- Rosewater Raspberry Meringues from girlichef
Drink Recipes
- Slushy Mango Mojito from The Urban Mrs.
- Pretty in Pink Punch from Noshing With The Nolands
- Pink Lemonade from Peanut Butter and Peppers
Tuesday, February 3, 2015
Review and Giveaway Babycakes Cupcake Maker The Big Book of Babycakes Cupcake Cookbook! Featuring Pumpkin Maple Mini Cupcakes with Biscoff Buttercream Frosting

Just in time for Thanksgiving, I have a fun pumpkin mini cupcake recipe to share...and a really fun gift pack giveaway! I recently received a super-cute pink Babycakes Cupcake Maker to try out in my kitchen and share my thoughts with you. This fun machine fits on the kitchen countertop and cooks eight mini cupcakes at a time…or about two dozen per recipe. Each batch of eight cupcakes cooks in about 5-7 minutes, so its pretty much instant gratification! Even better, this versatile little machine also makes muffins, mini pies, and savory mini appetizers. I also received a copy of the latest Babycakes Cupcake Maker cookbook from my friends at Robert Rose Publishing, so I decided to make a batch of Thanksgiving-inspired cupcakes over the weekend!

We had our Thanksgiving luncheon at work this week, so I decided to use the Babycakes machine to make Pumpkin Maple Cupcakes from the book, along with my slight tweak on their Hazelnut Buttercream Frosting. Instead of Nutella, I used Biscoff spread to compliment the cinnamon and nutmeg that flavored the cupcakes. This duo paired perfectly together…the cupcakes weren’t overly sweet, which really allowed the Biscoff-infused icing to shine! The Babycakes Cupcake Baker was a snap to use: simply plug in and preheat on the countertop. While the machine heated, I whipped up the simple scratch cake batter in my stand mixer. One note: the size of these cupcakes is between a full-sized cupcake and a bite-sized cupcake. That means that cupcake liners that fit the wells can be hard to find. Babycakes makes custom liners specifically for the machine, which can be purchased online. I was able to find them in packages of 100 at my local Kohl’s.
These portion-controlled cupcakes were very tasty…they baked up perfectly in the Babycakes Cupcake Maker. The machine is fun to use and comes with an instruction book, a pastry cutter for making mini pies, and an icing bag and tips. When I iced my cupcakes, I squeezed too hard and split the bag. I had to resort to icing my cupcakes the old-school way: with an offset spatula. They weren’t as fancy as using a piping bag, but I improvised by placing a glazed pecan half on top of each cupcake. It was decorative, and it also let anyone with a nut allergy know that my cupcakes had pecans inside.
Pumpkin Maple Cupcakes with Biscoff Buttercream Frosting
from The Big Book of Babycakes Cupcake Maker Recipes Cookbook

Step 1: Plug in and preheat the Babycakes Cupcake Maker. While it heats, prep the cake batter. Add the following ingredients to the bowl of a stand mixer: 1 room-temperature large egg, 1/2 cup pumpkin puree (not pie filling), 1/2 cup pure maple syrup, 1 tsp. vanilla, and 1/4 cup vegetable oil. Combine on med-high speed and beat for 1 minute.

Step 2: In a small bowl, mix together 1 1/3 cups all-purpose flour, 1 tsp. baking powder, 1 tsp. baking soda, 1 tsp. ground cinnamon, and 1/2 tsp. nutmeg, and 1/4 tsp. salt. Add the flour mixture to the wet ingredients in the mixing bowl and combine on low speed just until incorporated. Stir in 1/3 cup chopped toasted pecans.


Step 3: Place Babycakes cupcake liners into the wells in the machine...its hot, so be careful! Use a cookie scoop to fill each well with approximately 1.5 tbs. of batter. Close the top of the machine and bake for 6-7 minutes, until the tops are golden brown and a toothpick inserted in the center comes out clean. Transfer cupcakes to a wire rack to cool and repeat until all batter is used.


Step 4: When the cupcakes are cool -- about an hour -- make the icing. Combine the following ingredients in the bowl of a stand mixer: 2 tbs. softened butter, 1/2 cup Biscoff spread. Beat on medium-high speed for 1 minute, or until creamy. Gradually incorporate 1 3/4 cups confectioners sugar until blended. Add 4 tbs. whipping cream until the icing is light and fluffy. Ice the cupcakes and top with a candied pecan half for decor.


These cupcakes are totally yummy, and the portion-controlled size is definitely appreciated during the holiday season. These cupcakes are dense and moist…almost like a muffin in consistency…and the Biscoff-infused icing was divine! I can’t wait to use the Babycakes machine to make simple appetizers and maybe some holiday-themed mini brownies. The machine was easy to clean up since I used liners, and it easily stores in my kitchen cabinets between uses.
Now…who wants to win a Babycakes Cupcake Maker of their own AND a copy of The Big Book of Babycakes cookbook in time for the holidays?!?!?! I’ll be accepting entries through this Saturday, November 24th, and the winner will be notified via e-mail on Sunday, November 26th. For one entry, simply leave a comment below letting me know how you would use this versatile machine in your kitchen. For additional entries, Like Babycakes on Facebook and Follow them on Twitter. Make sure to leave me a separate comment for each entry since I’m using a random number generator to select the winner. One last thing…please be sure to leave your e-mail address on one entry so I can find you if you’re the winner.
I hope you all have a blessed Thanksgiving! I’m leaving for a quick visit with family in the Houston area after work tomorrow, but I’ll be back with a tasty and super-simple appetizer on Friday evening. I am so very thankful for the many blessings in my life…and this blog and my readers are among the most cherished gifts in my life!
Friday, January 30, 2015
Mini Chocolate Raspberry Cakes Featuring Top Hat Premium Dessert Sauces
 |
| Me with my Daddy and Mama (on my left)... and my Uncle Gerry and Aunt Therese (on my right). Anybody from Austin will recognize where we ate! |


Mini Chocolate-Raspberry Cakes
adapted from Better Homes & Gardens


Step 1: Make the filling for the cakes by combining the following ingredients in a mixing bowl: 1/4 cup Philly White Chocolate Indulgence cream cheese, 1/4 cup raspberry jam, and 1/4 cup Top Hat Raspberry Fudge dessert sauce. Whisk well to combine and set aside until youre ready to assemble the cakes.
Step 2: Make the frosting by combining the following ingredients with a mixer: 3/4 cup Philly White Chocolate Indulgence cream cheese and 6 tbs. softened butter. Cream on high until fluffy...about 3-4 minutes. Scrape down the sides of the bowl, then add 1/2 cup Top Hat Raspberry Fudge sauce, 1 tsp. vanilla bean paste, and 1.5 cups powdered sugar. Whip until thoroughly combined and fluffy.
Step 3: Assemble the cakes as follows. Place three store-bought mini sponge cakes well side up on a baking sheet topped with parchment. Spoon some of the filling mixture into each of the wells...and top with four fresh raspberries. Top with the remaining three sponge cakes well side down. Ice the mini cakes with some the frosting and refrigerate until ready to serve.
Step 4: Just before youre ready to serve, remove the cakes from the fridge for about 15-20 minutes to come to room temperature. Top with three more fresh raspberries on top...and ice cream is nice on the side as well!
These little cakes have a TON of raspberry flavor...to intensify it even more, you could brush a bit of chambord liqueur on the cakes before frosting if you have some onhand. The chocolate filling and raspberries in the middle are a really fun surprise when the cakes are cut into. Dessert should be fun...yes?
Ahem...you may notice fewer pictures in this post...and not up to my usual quality. My camera is giving me some issues downloading to my computer, so I had to grab my iPhone to snap these pictures just so I could post. Until I can figure out whats up and get it taken care of, please bear with me...hopefully this is a temporary issue! How about I make it up to you with a giveaway?
Top Hat is going to give one of you two jars of their yummy dessert sauces. To enter, all you have to do is visit the Top Hat website and check out all their yummy dessert toppings. Then come back here and leave a comment telling me which two flavors you most want to try. The winner will reserve two jars of these toppings to use in their own kitchen. Have fun...and good luck. I will accept entries until Wednesday, May 16th at 1159 p.m. Good luck!
Subscribe to:
Posts (Atom)